Newsletter Sign Up

8 Tips To Write Appealing Query Letters

A good query letter makes a good impression, a bad query letter earns a swift rejection.

Just when you think you’re done writing the manuscript and take a sigh of relief, the wrecking ball of reality hits you with more to do. Now you must find takers for your book who’ll in turn, find you the buyers for it. Now, there’s more writing to do; a careful and precise piece that wins over the agent or the publishing house. That apart, there’s the all-essential editing, proofreading, typesetting… the works!

So there is a lot you have to do once you’re done writing the draft. Putting a book out there is no easy task. It becomes easy only once when you’re established in the market. JK Rowling and Jeffrey Archer sure don’t have to worry about writing query letters anymore.

If you’ve chosen the high road of self-publishing then you don’t have to sweat about all this at all. For others taking the traditional route, we’ve got a guide to help you write a dynamic query letter which is your best shot at getting a reputable literary agent’s attention.

Though there are no standard rules to do this, the following are some tips to help you compose a query letter that positions you as a talented and trustworthy author and your book as a valuable investment.  


#1  Pay attention to the submission criteria

You must first decide if you want to approach an agent or a publisher. Before you start writing, spend some time to investigate the agent and make sure that they are likely to be interested. First look at their website and their submission guidelines. Be careful that you follow the instructions on their site.

You could also get a copy of the Writers’ and Artists’ Yearbook, which lists the agents with their clients and informs you about how to approach them.


#2  Personalize the letter for each agent  

Agents go through hundreds of such letters every month and can easily tell when it’s just a copy and paste job. It indicates that the author hasn’t done their research on the agent or the agency they’re querying.

Without personalization, your letter is just spam. One neat way to add a personal touch to your query is to reference*the agent’s existing clients.


“I am highly inspired by your client, Jacob Campen. The tense setting of Going Deep Down was a major influence on my novel.”


If something the agent has said or written comes up in your research, let it slide in. When it comes to making an impression, this trick does it!


“I read the interview you did with Humanoid Ink. Your views about lack of diversity in Sci-Fi really resonated with me. My book attempts to address this and bring a touch of pluralism to the genre.”


Don’t be too loud about it. Just make it a point to show that you’ve put in the efforts to pick the right agent.


#3  Craft an irresistible hook

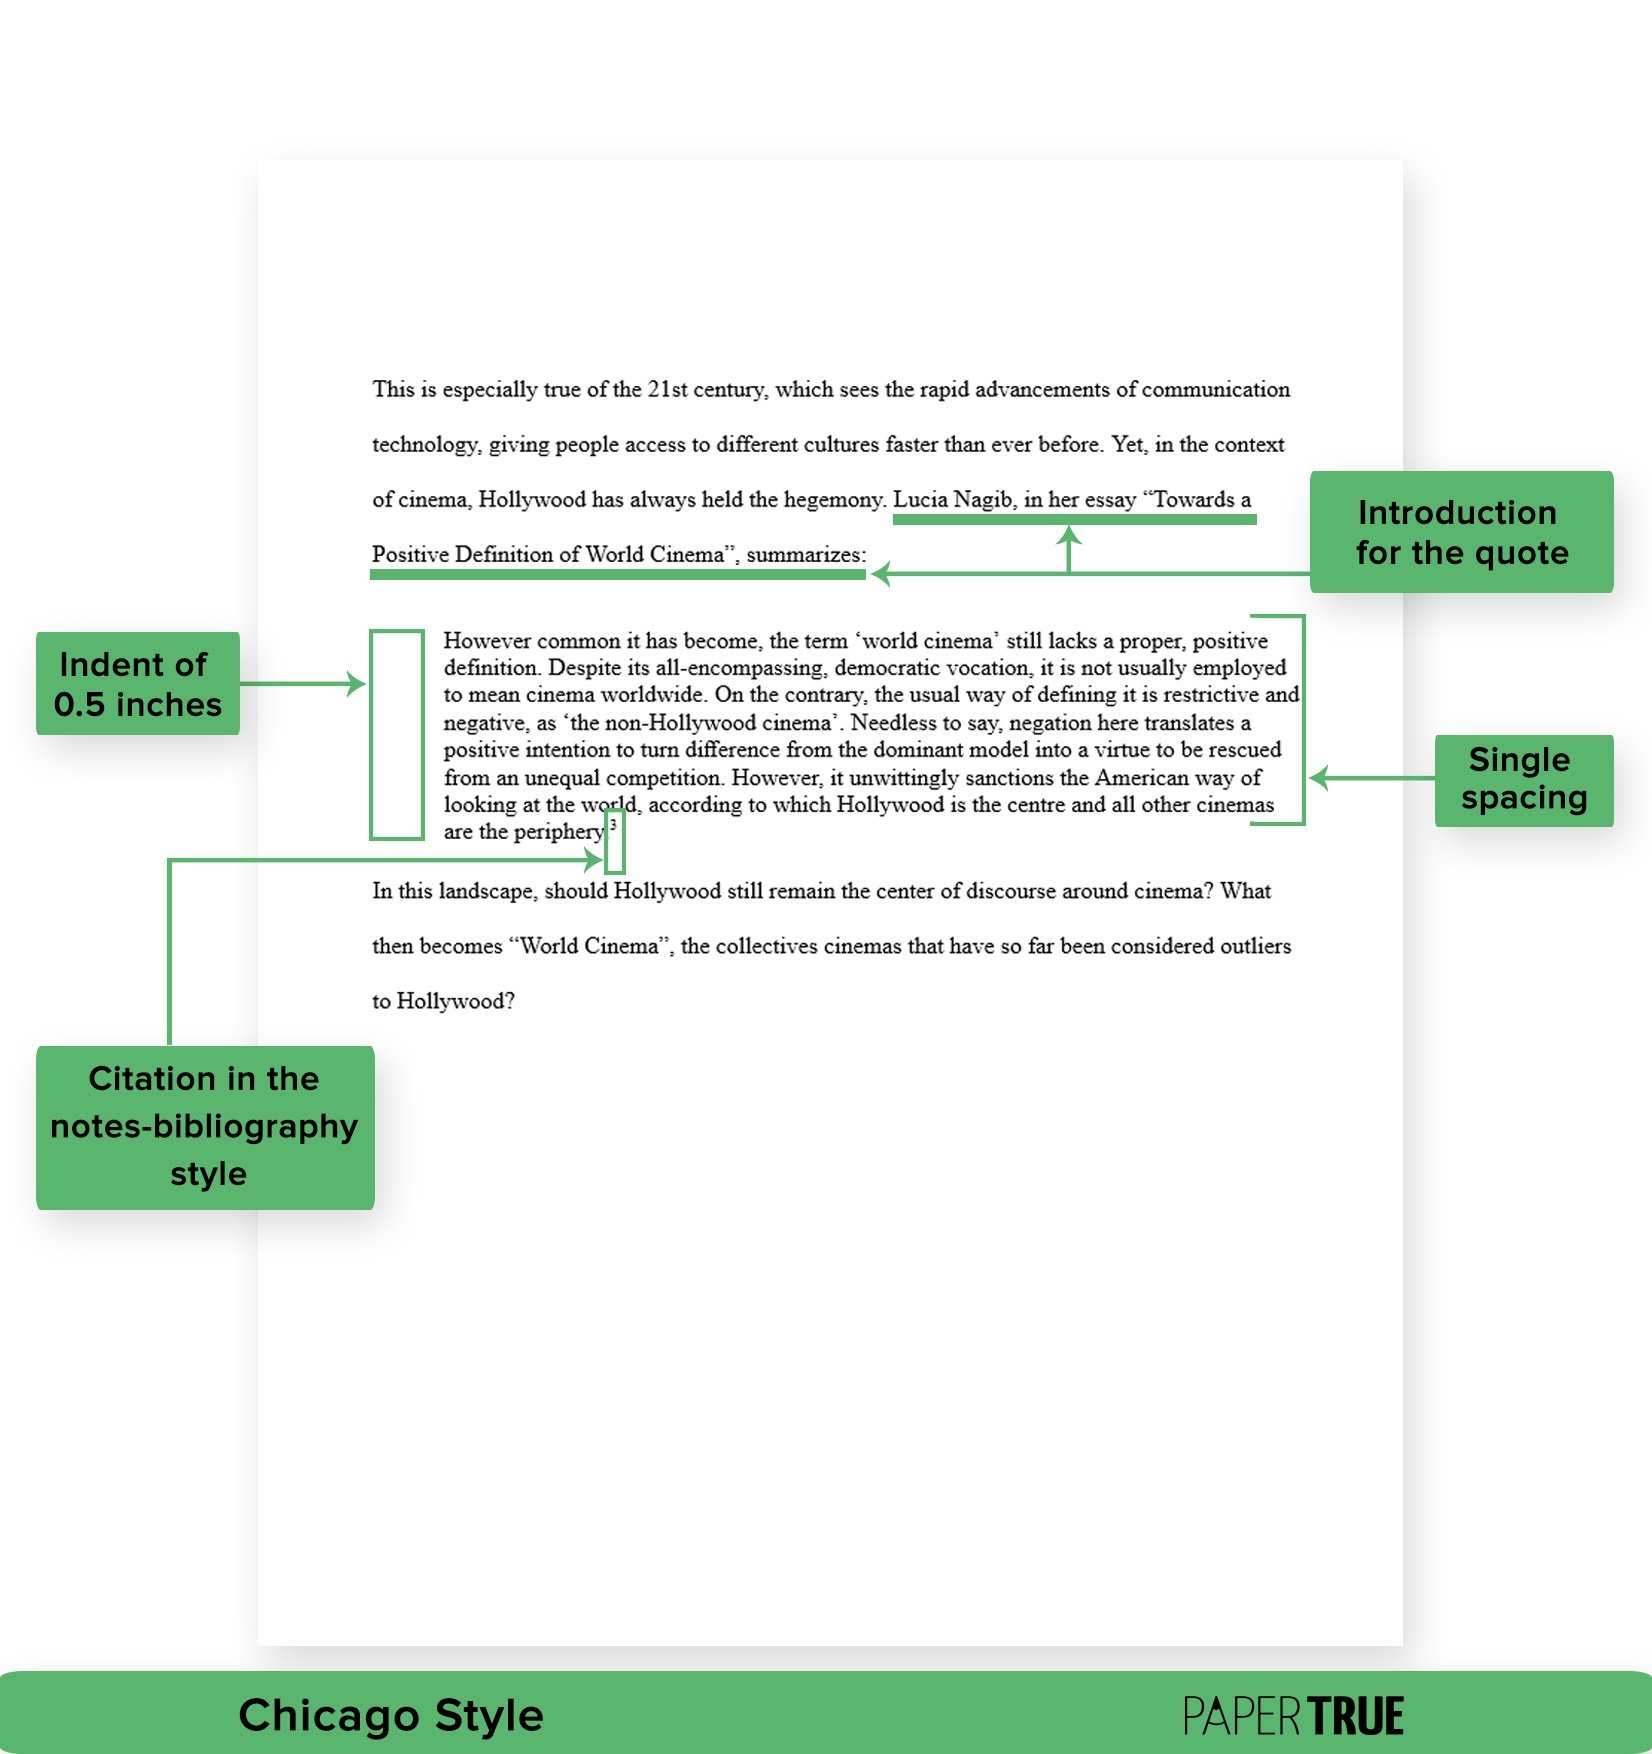
Most writers of popular fiction try to make the book un-put-downable for their readers in the first few pages. In a query letter, you have to do this with just a few lines. This part of the letter is known as “the hook.”

This can be done with anything that immediately captures the interest of the agent/producer: a quote, a controversial question or something that leaves the reader briefly stunned.  

The purpose of the hook is to show agents how your book is positioned differently than thousands of others in your genre.

#4  Attach an Intriguing synopsis  

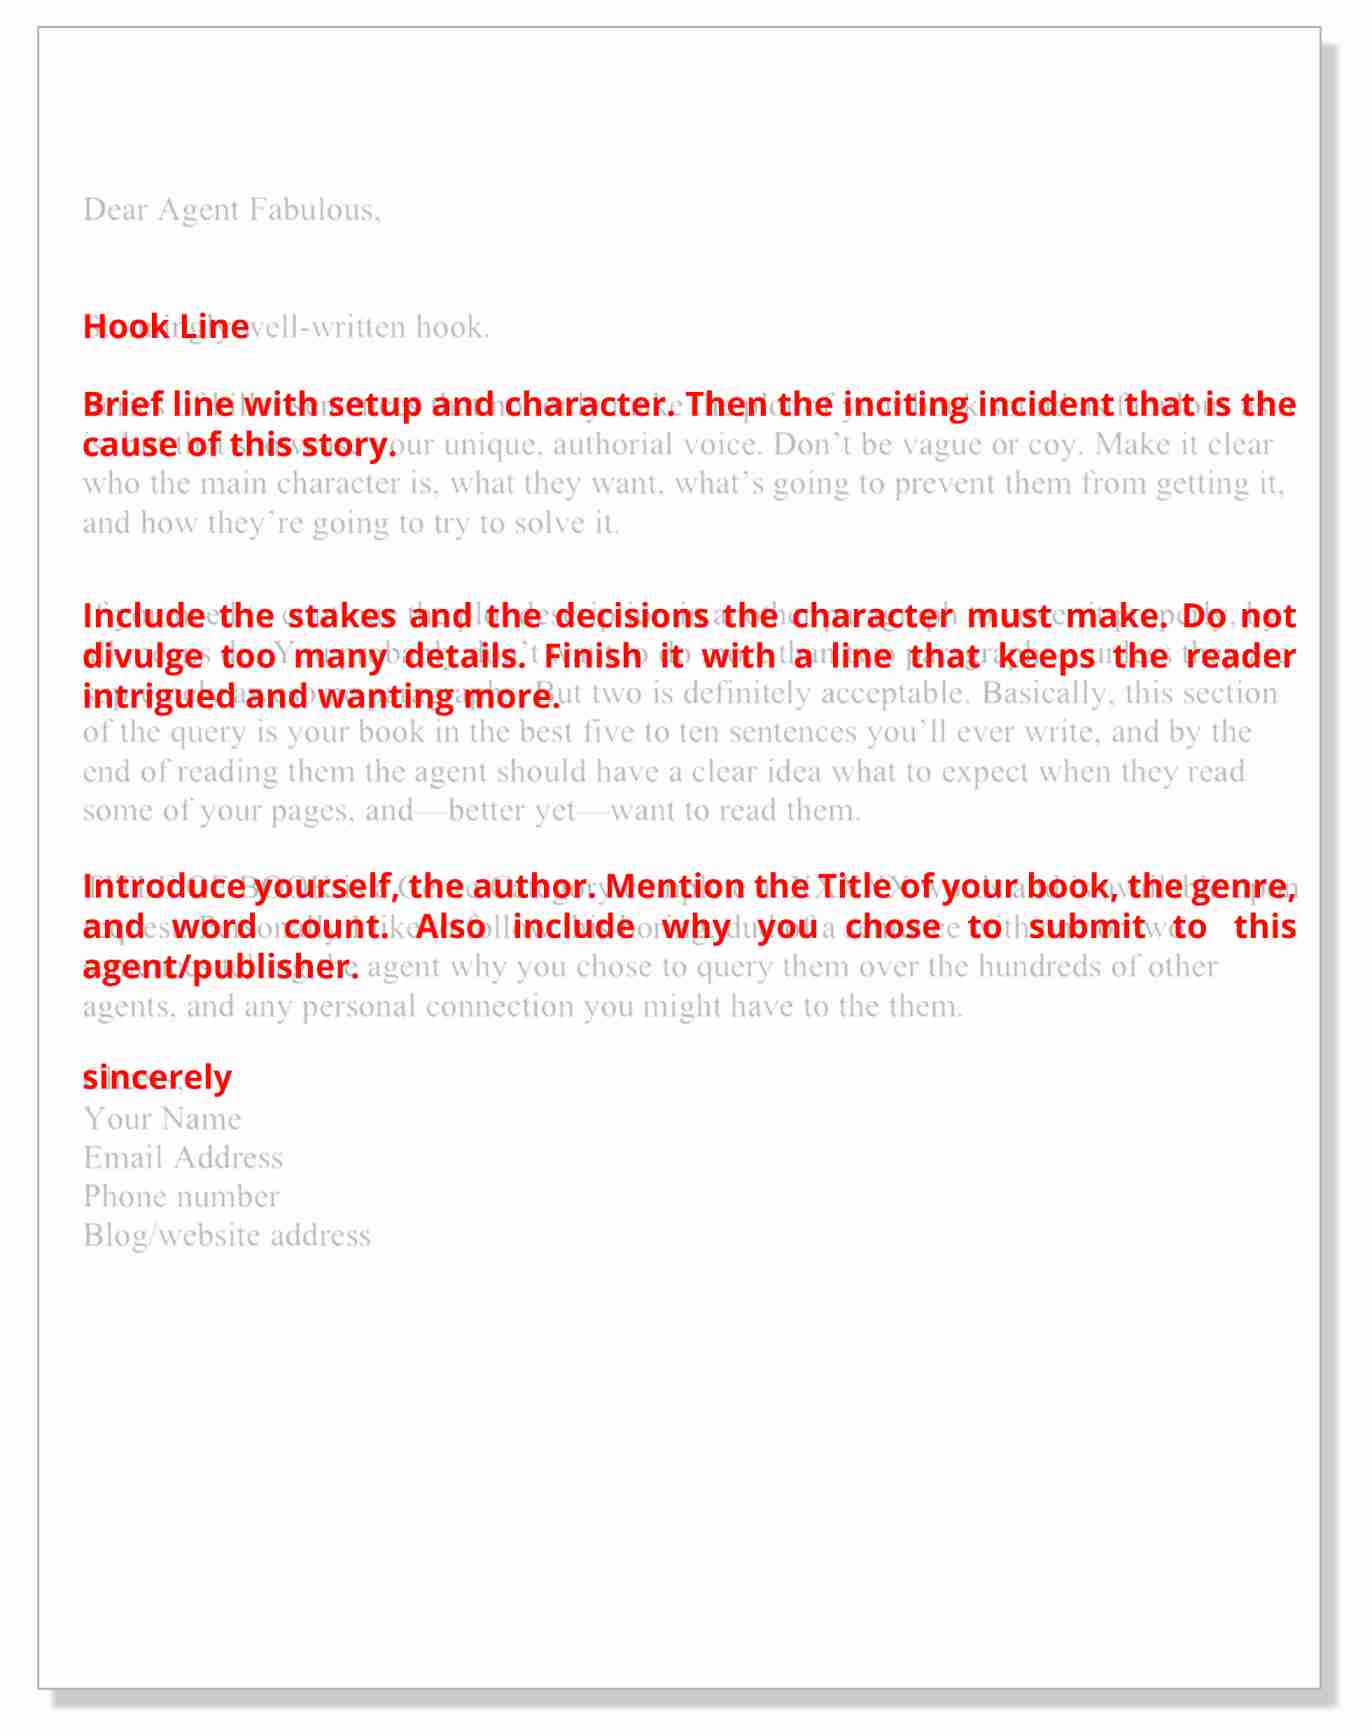
If a synopsis is specified in the requirements, attach one to go with your letter. This is the tricky part where authors get confused with what to and what not to add. Don’t struggle with telling every significant event in the book. But don’t make it a dry laundry list of events either. Let it read like a condensed form of your story without giving away any main bits.


#5  Keep it short

Most amateurs end up writing too much to impress. Remember that the query letter serves as the basic intro to your book (title, word count, genre) along with a teaser thrown in.

Again, don’t divulge into the details of your story. Keep the letter short, say 300 to 400 words at the most and keep it concise, orderly, and organized.

A good query letter is brief and to the point, no more than one page long. One page designed to intrigue, not crammed from top to bottom with narrow margins.


#6  Language is important

Treat this as a Business Letter. Which means, it has to be crisp and powerful. Additionally, your flair for writing and what the book holds should reflect in the letter. The language which fills the text should be vivid, specific and dynamic.

The one-line description or “The Hook” can make or break the deal for you. Use all your imagination and the vocabulary you’ve gathered over time to create an arresting, unforgettable piece that shows the heart and soul of your novel.  

Be honest about yourself. Don’t exaggerate your experience. Mention background only if it enhances your credibility for writing this book. If you have any published works in the bag, highlight such credentials to establish yourself as a sincere candidate. Be sure you’ve included the following details about your book:

  • Title
  • Word count
  •  Genre
  • Audience Comp Titles

The next step is super crucial.

#7  Proofread the Letter Thoroughly

There is zero margin for error when you’re writing to an agent. If they read your work and find a typo in some sentence, or a sentence that makes no sense, they won’t read further. If you don’t put the time and effort into your book, neither will they.

Make sure you create a workmanlike business letter, so it does the job. It’s short, smooth-flowing, written in a persuasive, specific language, with no errors of any kind – no typos, misplaced punctuations, spelling or grammatical miscues whatsoever. Remember, letter-perfect!

#8  A note of thanks in the Last paragraph

Make the last one a small section which shows your gratitude to the agent for taking out the time to read your letter and considering your proposal. Don’t make it too flowery though, let it have a professional tone right till the end.

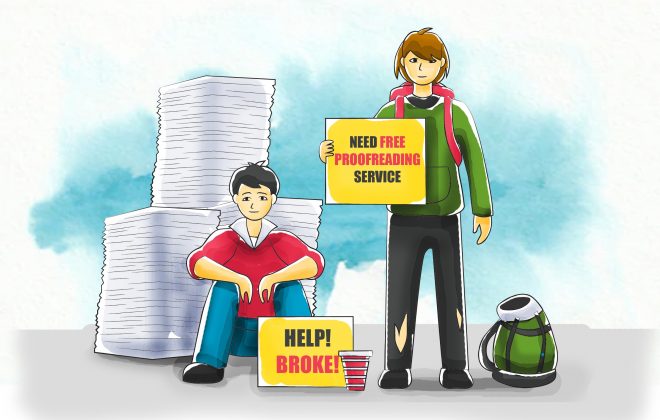
Get Your Query Letter Professionally Reviewed

PaperTrue is dedicated to helping authors chase their dreams. Like every written document, we also edit and proofread query letters with great panache. Our editors will edit your query to stress on the most fascinating aspects of your work, and also highlight any red flags that might prevent an agent from requesting your manuscript. We also improve your query’s lead paragraph and make your pitch more precise and efficient. With our expert editors to assist you, you’ll also learn how to write your next query letter more wisely.

Keep writing, be focused and stay professional. All the best!

What Are Proofreading Services For?

Proofreading has always been taken lightly by people who see it as an extension of editing. It’s not important to proofread as much as it’s important to edit your document. That is where we would like to poke you and tell you some important facts. Proofreading is like testing a machine to do the actual work. Just as a machine needs to pass an evaluation to see whether it works efficiently, a document ABSOLUTELY needs proofreading to make it free from spelling mistakes and formatting errors and make it error-free. 

A pen sits atop a bunch of papers with written text and corrections on them that look like proofing marks. A cup of coffee sits beside the papers on the table.

Since it is such an integral cog in the editing machine, it is best advised to give your document to a professional proofreader. We would suggest giving it to an established company instead of an individual because it’s more streamlined and efficient. Proofreading services ensure that your document is polished and ready to be published. Let’s look at what proofreading services do:

1. Ease your first-time proofreading fears.

If you are giving your book to a proofreading service for the first time, there is bound to be some intense to be or not to be happening in your head. The first thing that a proofreading service will do is explain what they will do and how they will proofread our work. The first thing that they will do is assure you that you are in good hands, if it is a top-rated service like PaperTrue and Scribbr.

2. Correct formatting errors in your manuscript/document as per industry standards.

Every research journal has a specific format in which it wants a paper to be published in. Sometimes, this is the cause for many papers being rejected even if they have a strong thesis statement. What proofreading services do is that they format your paper according to the format asked in your specific journal i.e. the margin requirements, the font size, the indents, the spacing, etc. 

A proofreader goes through a paper, marking errors with a pen.

3. Help you navigate tricky punctuation areas such as the oxford comma.

The oxford comma is a comma used after the penultimate item in a list of three or more items. For example, ‘She is a mother, entrepreneur, artist and, a singer’. This comma has been the root of many debates, broken friendships, divorces… okay, not we won’t go that far. Confusing punctuation marks are always better when scanned under a professional eye which is precisely what professional proofreading services do. 

A close-up image of a red pen lying atop a page with formatting and grammar errors marked in red.

4. Verify your sources and facts stated in the document.

This is one of the most important things that a proofreading service is for. When your facts are incorrect, your content holds no value no matter how well-written it is. It is very important to verify facts and sources that you have quoted in your document so that it holds value.  

5. Correct your citation and citation format. Citation formats vary according to disciplines.

For example, MLA is often used in Humanities, I often used Chicago style in history, APA is used in psychology, etc. Mixing up of citation formats can be erroneous and can lead to your thesis or paper getting rejected. Therefore, it is important that you get hold of a proofreading service and assign them the responsibility of getting your citations in order. 

Proofreading services are important for your manuscript to get that final stamp of approval and to ensure that it is free from any spelling and formatting errors that could have been easily avoided. It is a very underrated step in the publishing process that people often think that they can do it themselves. That’s why, now that you have finished your manuscript/paper/document, give it to us while you sit back and enjoy your much needed time away from work. Check out our article on the need to proofread and which top proofreading services you can rely on to make that free time even sweeter.

Em Dash vs. En Dash vs. Hyphen: When to Use Which

If you find it hard to differentiate between em dash vs. em dash vs. hyphen, you’re not the only one. Many of us are confused about when to use a dash, when to use a hyphen, and how to tell apart the two types of dashes.

As your editors and proofreaders, knowing grammar and punctuation rules inside out is kind of our job! In this article, we’ll tell you how to use an em dash vs. en dash and provide a few examples to make things simpler. Let’s start with the most basic question: How does a dash differ from a hyphen?

Dash vs. hyphen: Are they the same?

Beyond the fact that they are horizontal lines, dashes and the hyphen have absolutely nothing in common! They are different punctuation marks that signify separate things and are used for separate purposes.

Here’s how you can easily remember the key difference between a dash vs. a hyphen:

A hyphen (-) is shorter and is used in between compound words and numbers. It is also used to emphasize certain parts of words.

A dash (– or —) is longer and, depending on the type, is used to connect two grammatical units or to signify a range.

What is a hyphen: Definition and uses

A hyphen is a short horizontal line (-) that can be used to connect two words, to form a compound word, or to spell out numbers. It is also used to emphasize certain parts of a word.

If a hyphenated word is used extensively over a period of time, the hyphen gets omitted gradually. For example, the previously hyphenated word “online” is now used without a hyphen due to its widespread application.

Unsure whether to use a hyphen or not? The dictionary is your best friend! But we can certainly cover some basic rules of hyphen usage. We’ll also provide various hyphen examples so it’s easy for you to differentiate between a hyphen and a dash.

Here’s how to use a hyphen correctly:

1. To form compound words.

Compound words are two or more words that can be used together to form a unit. A hyphen is sometimes used to form these words. For example: sister-in-law, self-esteem, merry-go-round.

Remember that hyphens are used with compound adjectives if the adjectives are used before the noun. Here are a few examples of hyphens in compound adjectives:

This one-of-a-kind chair is surprisingly comfortable!

She is a twelve-year-old math prodigy.

If compound adjectives are used after nouns, they are written without a hyphen.

This chair is one of a kind and surprisingly comfortable!

The math prodigy is just twelve years old.

Note: Do not use hyphens if compound adjectives end with -ly.

(correct) She is a highly trained martial artist.

(incorrect) She is a highly-trained martial artist.

2. To spell out numbers.

Numbers from twenty-one to ninety-nine are hyphenated when written down.

She got her first job at the age of twenty-two.

Today is our twenty-fifth wedding anniversary!

3. To separate prefixes and suffixes from the root word.

Hyphens are used with a certain set of prefixes and suffixes where they denote the relationship between the root word and the affix. Let’s take a quick look at some of these terms with plenty of hyphen examples!

Prefixes:

Self-

Self-esteem, Self-respect, Self-service, self-aware, self-confident

All-

All-expenses-paid, all-night, all-encompassing, all-important, all-female

Cross-

Cross-examine, cross-check, cross-country, cross-section, cross-breed

Suffixes:

-Style

Minimalist-style, goth-style, vintage-style, co-ordinating-style, victorian-style

-Elect

President-elect, vice president-elect, mayor-elect, governor-elect, minister-elect

-Free

Sugar-free, caffeine-free, alcohol-free, sulfate-free, paraben-free

4. To indicate pauses between words.

Hyphens can be used between letters to emphasize a part of the word or create a stuttering effect.

The spelling of pheromones is p-h-e-r-o-m-o-n-e-s.

It is so c-cold, I’m freezing.

We shouldn’t have come here, I’m s-s-cared of g-g-hosts!

Please note that this usage is not typical and is usually found only in creative writing.

What is a dash and when to use it

Dashes are horizontal lines slightly longer than a hyphen and are mainly found in typeset documents.

Unlike the solitary hyphen, there are two types of dashes: the em dash and the en dash. An easy way to distinguish them is to connect their main functions with their length. The longer em dash (—) is used to connect two longer grammatical units such as clauses or sentences. On the other hand, the shorter en dash (–) is used to connect shorter grammatical units such as numbers or words.

Let’s consider the dashes in some more detail.

Em dash (—) vs. en dash (–)

It’s easy to confuse the em dash with the en dash, but a simple tip can help you tell them apart. The clue is in their names! The dashes are named after the letters M and N. The em dash is roughly the width of the letter “M” while the en dash is the width of the letter “N”!

Since “M” is a wider letter than “N”, you can easily tell them apart. Now, let’s look at the real difference between the two: their uses. The em dash is used in place of a comma, colon, or parentheses while the en dash is used to indicate a range or replace the words “to” or “through”.

Let’s take a closer look at some em dash examples for a deeper understanding of how it is used.

What is an em dash?

The longer of the two dashes, the em dash, is definitely striking. This is because it is often stylistically used by writers to draw attention to a particular part of a sentence. Let’s take a look at the multiple interesting uses of an em dash with some examples.

Here’s how to use an em dash:

1. To join two or more grammatical units.

Sometimes writers use the em dash in place of two commas or parentheses to draw attention to the information placed between the em dashes. In this way, it is used to connect two sentences, phrases, or clauses.

My cousin—the one who studies film and media—is visiting this July.

The Fault in Our Stars—one of the most touching books I’ve ever read—has a movie adaptation.

2. To create emphasis on an essential part of the sentence.

The em dash is used in place of a colon to convey suspense and anticipation. It is also used to embellish a certain point you’re trying to make.

All of you did a phenomenal job in today’s quiz—especially David.

The next class is one everyone looks forward to—Art!

The beach, the blue skies, and friends to enjoy it with—what more could I ask for?

3. To signify a sudden interruption.

Em dashes can be used to depict a sudden interruption in dialogue.

“Hey, I truly am so grateful—”

“Oh, enough with those formalities! Aren’t we friends already?”

What is an en dash?

The shorter of the two dashes, the en dash, is used to draw attention to the relationship between two words or numbers. We’ll show you how to use the en dash with some helpful en dash examples.

Here’s how to use an en dash:

1. To suggest a range.

The en dash can be used in place of the words “and”, “to”, and “through” to signify a range or a period.

The notice in the hotel lobby stated, “Rooms 101–205 will be unavailable due to renovations.”

The Spanish flu (1918–1919) was one of the deadliest pandemics in history.

Note: In paired conjunctions like “from…to”, and “between…and” the second part of the conjunctions “to” and “and” are retained in order to complete the conjunction.

(Incorrect) She lived in Tokyo from 2011–2020.

(Correct) She lived in Tokyo from 2011 to 2020.

Note: The en dash is a special character that is not easily rendered on a keyboard, so it is mostly found in typeset material. People generally replace the en dash with a hyphen in such cases since it is easy to use.

2. To describe the relationship between two grammatical units.

The en dash is a versatile punctuation and can be used to describe directions, relationships, scores (or votes). Here are a few examples:

The Bombay–Goa train leaves at 5 pm today.

The Springdale Giants won 2–1 against the Sunnyside Seagulls.

The mother–daughter duo was certainly beautiful.

3. To replace a hyphen in compound adjectives.

Although uncommon, the en dash can be used instead of a hyphen in a compound adjective. There are two such instances: when the adjective is an open compound or a hyphenated compound.

An open compound is a combination of two or more words that are divided by spaces. It’s taken as a single unit even if includes spaces between the words. For example: Hot dog, sleeping bag, black eye.

In this case, a hyphen cannot be used because more than one grammatical unit is involved. So, an en dash is used to make things easier. Here’s an example:

Her Martha Stewart–style chicken was a hit at the party.

Although less frequent, an en dash is used in a hyphenated compound adjective. Since a hyphenated compound already contains one compound word, the en dash clarifies the relationship between involved grammatical units. Take a look at the below en dash example:

The kindergarten caters to pre-school–educated students.

British English usage of the en dash

In British English, the em dash is generally replaced by the en dash with spaces on both sides. Let us understand this with the help of a few examples.

Tokyo is a beautiful—not to mention extremely clean—city with gorgeous skylines.

Tokyo is a beautiful – not to mention extremely clean – city with gorgeous skylines.


I did not expect such a stellar performance—especially from Candice!

I did not expect such a stellar performance – especially from Candice!


Can you clean the window—actually, just get me the sponge instead.

Can you clean the window – actually, just get me the sponge instead.

Free Proofreading Services for Broke Students

You’ve finished writing your paper in a scramble and you know it’s not been your best attempt. The deadline is knocking at the door, and you need someone to help you fix it. Your friends are all stuck in the same rut. 

So, who you gonna call? Ghostbusters!

Nope.

Your paper is full of grammatical errors, sloppy formatting, and improper citations. It’s best you leave those kinds of spooky errors to online proofreading services. 

But what if you’re broke and can’t pay the premium to get your paper professionally checked, who you gonna call then? Here are some friendly options that won’t cost you any money: 

Grammarly 

The popular app and extension for your browser that checks grammar, spelling, plagiarism and more. Once added, it seamlessly fits itself into most writing platforms including MS Word, WordPress, Facebook, Twitter and more. It’s now being pitched as being your “Free Grammar Assistant.” 

But there obviously are many limitations with the free version on the app, it only does a basic grammar and spelling checks. To avail all its features, you must buy the premium version.

Ginger Grammar Checker

The Ginger Grammar Checker corrects a vast range of English Language errors. It offers free grammar and spell-check as well as premium online proofreading software. Plugins are available for most browsers, if not that you can just visit the website and feed in your text there for a free check.

Hemingway App

The front page of the website cleverly explains what the software does and how it can help you. The grammar checker is sharp and won’t let a single error slide in your writing. Being fast and efficient makes it ideal for self-editing academic texts, fiction, and non-fiction writing.

Just remember, the free checks have limited features and will only get the job half done. The paid versions are comprehensive but cost too much if you don’t have too much content to run through them. 


Online proofreading services 

Should you hire a paid online proofreading service when you’re broke? Might as well stick to one of those free apps who do the job even if only half done, it’s at no cost. That’s a valid point. But here are some reasons trusting humans (experts) on checking your paper is far better than relying on bots. 

1. The bots will only scratch the surface

They aren’t programmed to fix everything. You must get the paid version at some point to unlock all features. And that can be expensive, considering the subscriptions are yearly, or quarterly at the least. 

A quick check by academic proofreading experts is much more affordable. One time processing fees and free revisions! 

2. Discounts  

Academic proofreading websites have great customer service. Visit any one of them and you’ll have the chat window pop out to provide you with all the help possible. Tell them you are a broke student who needs this service, but also at the cheapest cost possible and they will make cost adjustments for you. 

3. Keeping it real 

The bots are bots. They are still learning. And they aren’t taking lessons from an actual professor. They sure as hell aren’t submitting any papers to justify the lessons they learned. So they don’t know what it takes to fulfill the requirements of a stringent professor who wants everything in a particular order; the painstaking citations and a set of weird rules to be followed. 

An academic expert though has been through this grind and knows what you want and ultimately what your professor wants and what’s needed to keep the highest grade. 

4. Express delivery 

You’d think that for anyone to go through a wall of text and then fixing it will take at least a day. Nah-ah! Most online proofreading services will return your document within 24 hours. Some will have it processed in as little as 3 hours’ time. 

Remember kids, regardless of your financial conditions, always remember: proofreading your papers before you turn them in, is absolutely necessary!

Why is it important to add references to your thesis?

Why should I reference my thesis?

It’s the first question every student attempting a thesis asks. Not at all surprising, given the amount of effort and endless list of referencing styles.

But what is its importance, why do professors insist on citations? The obvious answer that comes to mind is to avoid plagiarism accusations.

But there’s a lot more to the necessity of citations than just that.

In simple terms, referencing is the process of acknowledging all the sources you use in your work. These could be words and ideas, facts, images, videos, audio, websites, statistics, diagrams and any other data that you have borrowed (i.e, not your own).

A lot of your thesis is directly/indirectly derived from the work you read in your literature review. The references section helps your reader demarcate what your work is and what other work you have cited to make your point.

As far as citation styles are concerned, there are just too many to keep track of. Thankfully, they’re mostly sorted by discipline.

The commonly known/used formats include the Chicago Manual of Style, APA and MLA, but certain universities and schools also tend to have their own styles (OSCOLA, for example). To add to this, different styles also have specific requirements pertaining to what is being cited.

So with all the hassle involved, how necessary is referencing? And how much?

Let’s get to it quickly.

Why should I reference my thesis?

To avoid being accused of plagiarism

Like we mentioned right at the beginning, this one’s a no-brainer. You might think that paraphrasing certain sentences would make it your own and therefore eliminate the need to cite. That’s not true, however, and it’s extremely crucial to give credit to the right source.

Besides, researchers who may someday look at your own work to quote from are always hunting for the right source to cite from.

Just don’t be a copycat.

Shows what you know

You know the amount of reading, watching and curating of information that has gone into months of preparing your dissertation. Citing it will only show your readers the depth of your reading, and the vast literature involved will further lend weight to your work.

Lends credibility and authority to your own work

When you cite, you’re distinguishing your own words and thoughts from another person’s. Your entire thesis is essentially an argument you’re making to prove a point (your hypothesis). So the more data you have to back your argument up, the better!

Academic integrity

People take plagiarism very seriously, although in some cases it could happen unintentionally. Accurate referencing depicts your honesty and the fact that you’ve tried your best to credit everyone involved in making your thesis what it is.

Some universities do have penalties in place in case of plagiarism, so it’s always better to be careful!

Now that you know exactly why referencing is important, don’t get carried away. How do you decide how much referencing is too much? Well, the answer to that is that it’s mostly a judgment call, subject to your word count, University requirements or as suggested by your dissertation/thesis guide.

What you must essentially remember while referencing is that it is data backing up your existing thoughts and arguments, not the primary body of your work. Check the credibility and authority of your sources, and pick those which will best illustrate and support your words while taking care not to let it cloud your own thoughts.

The Plethora of Thesis Referencing Styles

To help you identify the different types of referencing styles, here are a few simple examples of the book ‘Good Omens’ cited in various common styles:

American Psychological Association (APA):

Pratchett, T., & Gaiman, N. (1991). Good Omens. London: Corgi Books.

Modern Language Association (MLA):

Pratchett, Terry, and Neil Gaiman. Good Omens. Corgi, 1991.

Chicago (Author-Date):

Pratchett, Terry, and Neil Gaiman. 1991. Good Omens. London: Corgi Books.

Chicago (Notes and Bibliography):

Pratchett, Terry, and Neil Gaiman. Good Omens. London: Corgi Books, 1991.

Vancouver:

Pratchett T, Gaiman N. Good Omens. London: Corgi Books, 1991.

IEEE:

Pratchett and N. Gaiman, Good Omens. London: Corgi Books, 1991.

Harvard:

Pratchett, T. and Gaiman, N. (1991) Good Omens. London: Corgi Books.

Our editors at PaperTrue have specialized in editing various referencing styles and would love to help you out. Simply visit PaperTrue.com for a quick chat to learn more.

Happy Referencing!

Here are some related articles that you might find interesting:

How did proofreading change modern publishing?

Let us address the elephant in the room first. What is proofreading? Proofreading is the final step in the editing process that ensures that your document is free from any minute errors and is ready to be published. If you recall, there was an error in the King James Version of the Bible in which it said “Thou shalt commit adultery” instead of the opposite, inciting shock and laughter from its audience and its critics. There are many blunders committed throughout history, especially for sensitive documents, which must have knocked sense into the heads of publishers to get someone to check the manuscripts before they were printed. 

First, there were handwritten copies circulated everywhere. These copies were only of religious documents and important scripts written by nobles and people from the elite class. This means that even if there would be an error in one copy, it would be possible to scrap that copy and write a new one. But imagine the tediousness of the entire process! Maybe that’s why people were relieved when Gutenberg showed up with his printing press, full of metal letters stamped in ink. 

Gutenberg is known as the ‘Father of the Printing Press’ for a reason. He made the printing process affordable and therefore allowed the middle class to get access to something that was considered only for the elites: education and literacy.

A 1499 contract held the author responsible for proofreading. From then to now a galley which is a long tray holding a column of type, is used to make proofs. They are hence called galley proofs. We also use this term for the first copy produced in photo-composition and other typesetting forms, which do not involve the metal type.

If you think that heated discussions between proofreaders and writers happen now, you are sadly mistaken my friend. Lawsuits between printers and authors were common throughout the 15th, 16th, 17th and 18th centuries. There is evidence of authors’ apologies and complaints not seeing corrected proofs in books, error sheets along with this. 

Proofreading is even older than publishing if you look at the etymology of the word. How did the word ‘proof’ develop? The earliest known origins of the word from the Latin word ‘probare’, which means to confirm by testing. So we can conclude that the English word proof can mean both to confirm something with evidence and to subject something to a test. Therefore, the word ‘proof’ rears its head in the word ‘proofreader’. Since the word ‘prove’ means ‘test something’, the pre-publication process and the versions of the pre-published books were known as galley proofs. And the people who checked these galley proofs were ultimately known as proofreaders. And, reasonably enough, the people who checked these ‘proofs’ for errors were termed ‘proofreaders’.

Fast forward to now and you have proofreaders as one of the most important people in the publishing process, without whom your book will probably be a mess. Proofreaders check for last-minute errors, spelling mistakes and formatting and your book turns out impeccable because of this finishing touch. Check out PaperTrue for our expert editing and proofreading services! 


Chicago Style Citation: Quick Guide & Examples

Unlike other commonly used citation formats like APA or MLA, there are two varieties of Chicago style citations. In this article, we’ll explore both forms of citation for a Chicago style paper and provide several examples you can emulate. 

Since its original publication in 1906, the Chicago Manual of Style has evolved a lot. It is currently in its 17th edition (as of 2017). 

Chicago style citations: two varieties 

Researchers and writers can create a Chicago style citation in two ways: the notes and bibliography system or the author-date system. Aside from differences in the style of in-text citations, the notes-bibliography system and the author-date system share a similar structure and formatting style.

What Chicago citation format you should use depends on your discipline and the guidelines given to you by instructors or publishers. Read on to know more about each style and when you can use them in your academic writing. 

A. Notes and bibliography 

In the notes and bibliography style, in-text citations are marked by footnotes or endnotes, with source numbers indicated by superscripts (raised text) within the text. This is usually followed by a bibliography at the end of the paper. 

This Chicago style citation format is commonly used in humanities—in disciplines such as history, art, and literature. This is primarily because the notes-bibliography style is flexible to accommodate a variety of unconventional academic sources like videos, online sources, transcripts, etc.

It also accommodates sources that may not fit into the author-date system, such as webpages with no author or literary sources with no single date of publication. 

Footnotes and endnotes 

The sources referred to on each page are listed in the footnotes at the end of the page or in endnotes at the end of the document. This is list is in order of reference. Within the text, the citations are denoted numerically by a superscript.

Follow these general guidelines while creating Chicago style footnotes and endnotes: 

  • Add footnotes at the bottom of the page you have referred the source. 
  • Add endnotes on a separate page after the body of the paper. 
  • Place superscript numbers at the end of a sentence or clause, after the concluding punctuation mark. 
  • Ensure each superscript number corresponds to its respective entry in the notes. 
  • Begin each note with the name of the author(s) as listed in the source (not inverted), followed by the source name. 
  • Add publication details relevant to the source—including page numbers, year of publication, and publisher. 
  • Separate each element in an entry with periods or parentheses. 
  • Add shortened notes for every subsequent reference to a source. 
  • List authors’ complete names for sources with up to three authors. If a source has four or more authors, add “et al.” after the third author. 
  • Number notes consecutively starting with the arabic numeral “1” for the entire text or each chapter. 

Note: When to use Chicago style endnotes?

The official CMOS handbook does not have specific guidelines for when to use Chicago style footnotes and endnotes. This is usually at the discretion of your instructor and the guidelines set by your university or publication.

Whichever in-text citation style you follow, ensure that you stick to your chosen type of notes consistently. See below for a Chicago footnote example:

An example of Chicago footnote formatting.

Bibliography 

Chicago style papers following the notes-bibliography system usually require a bibliography at the end of the paper. This is a detailed list of all the sources you have cited throughout the main text. 

You may be exempted from including a bibliography at the end of a document if you have provided detailed entries in the footnotes or the endnotes. If you’re unsure about whether you need to add one to your Chicago style paper, consult your instructor or publisher. 

Follow these guidelines to create a Chicago style bibliography: 

  • Place the bibliography on a new page directly after the main text, before indices and appendixes. 
  • Title the section with “Bibliography” and center-align the text. 
  • Apply a hanging indent for each entry. 
  • Arrange all sources alphabetically, by the last name of the (first) author of each source. 
  • For sources with no author, arrange by source title. (Alternately, you may write “Anonymous” or “Anon.” if you want to credit it to an anonymous source.)
  • For sources with two or more authors, invert only the first author’s name. 
  • List the names of all authors for sources with up to ten authors. 
  • For sources with over ten authors, list seven names and follow with “et al.”. 

Chicago style citation examples: Notes and bibliography 

See below for examples of Chicago style citations for books, book chapters, journal articles, and websites. We’ve included the format for Chicago style footnotes and endnotes, short notes, and the bibliography entry. 

1. How to cite a book in Chicago style


2. How to cite a book chapter 


3. How to cite a journal article


4. How to cite a website in Chicago style 


B. Author-date 

The author-date system is the second method of Chicago style citations. This citation format is typically used in physical, natural, and social sciences documents.

The Chicago author-date format consists of two components: in-text citations in the body text and a matching entry in the reference list, which is at the end of the academic work. The reference list provides complete bibliographic information about all the sources you’ve used throughout the text. Let’s take a look at each component more closely. 

In-text citations 

If you are using the author-date format, you will be required to add in-text citations within the body text. The convention is to add in-text citations at the end of sentences referencing sources.

Follow these guidelines to add Chicago style citations in your academic work: 

  • Place the Chicago parenthetical citation at the end of a sentence, before the concluding punctuation mark. 
  • Include the author and year of publication in parentheses, with no punctuation in between. 
  • If you have named the author(s) of a source within the body text, add the year of the source’s publication in parentheses. 
  • Add relevant page numbers in the in-text citation, if you are referring to specific sections of the text. 

See below for a Chicago style citation example with and without an author in parentheses. Here’s what a standard Chicago style in-text citation looks like: 

The essay highlights the importance of readers contributing to a text’s discourse in the larger society (Barthes 1967). 

If you’ve already referenced the author within the body text, you can write the Chicago parenthetical citation like this: 

Barthes (1967) emphasizes the role of the reader in generating discourse about a text, rather than accepting the singular supremacy of the author’s intent. 

To add a page number or page range, format the in-text citation as shown below: 

(Barthes 1967 42)
(Barthes 1967 42-44) 

Reference list

Each Chicago style in-text citation has a matching entry to the reference list at the end of the text. The list and the format of each entry largely follow the same format as the bibliography in the notes-bibliography section, with a few minor alterations. We will look at these below.

Follow these guidelines while creating a Chicago style reference list for your essay or paper:

  • Start the reference list on a new page, with the center-aligned title “References” or “Reference List”. 
  • Arrange the list of sources alphabetically by the author’s last name. 
  • Follow this with the year of publication and end with a period. 
  • Continue structuring the entry in the same format as a bibliographic entry. 
  • Invert only the name of the first listed author. 
  • Capitalize English-language titles according to headline-style conventions. 
  • Abbreviate noun forms such as “editor”, “translator”, “volume”, and “edition”. 
  • Spell out verb forms such as “edited by” and “translated by”. 

Chicago style citation examples in author-date 

See below for a list of Chicago style citation examples. We’ve included sample in-text citations and reference list entries for books, book chapters, websites, and journals, which are commonly used sources in the Chicago citation style.

1. How to cite a book in Chicago 


2. How to cite a book chapter in Chicago style


3. How to cite a journal in Chicago style 


4. How to cite a website in Chicago style

How to Write a Thesis Statement: Examples & Tips

While writing academic essays or papers, you have to pay microscopic attention to your train of thought. Whether it’s a college essay or a research paper, a strong thesis statement can either make or break your document. But how to write a thesis statement that best represents your work? 

In this article, we’ll answer this and other questions related to a thesis statement for essays, papers, or longer documents. We will discuss all aspects of a thesis, its importance, and its types. We’ll also provide a few thesis statement examples so you understand how to write a strong thesis.

Before we begin, we should have clarity on one question: What is a thesis statement?

What is a thesis statement? 

A thesis statement sums up the central point of your paper or essay in the span of a few sentences. It is usually placed near the end of your introduction. The rest of your essay builds upon the thesis statement by addressing different aspects of it.

The opening thesis statement serves as an assertion that the rest of your essay can validate and align with. Further, it serves as a roadmap to the entire essay. As such, it should heavily draw upon your unique understanding of the subject.

Since the thesis statement is placed at the end of the introduction, take your time introducing the subject. Structuring an introduction that conveniently leads to your thesis statement is a good practice.

A strong thesis statement:

  1. introduces the subject,
  2. makes an assertion, and
  3. provides reasoning for it.

Take a look.

How to write a strong thesis statement: 1. Introduce the subject 2. Make your assertion 3. Reason your assertion

Let’s go through some guidelines to help you come up with a strong thesis for your essay.

How to write a thesis statement 

Here are some basic guidelines for writing a thesis statement:

  1. Present your point of view in two sentences. 
  2. Clearly indicate the logical progression of your research.
  3. Always take a case-by-case approach. Based on your research, you may also opt for a 3-part thesis statement.
  4. Clearly dictate your assertion on the topic. 
  5. Create a thesis statement that is debatable, but can be proven with evidence and reasoning. 
  6. Place your thesis statement as a conclusion to the Introduction section of your paper.  

We can only give you some tips on how to write a thesis statement, but a strong thesis only comes out of strong research and reading. So, make sure to read your sources carefully before you begin to write your essay.

Follow these tips to write a strong thesis statement:

#1 Formulate your research question. 

Filtering your line of research is the first step while writing a strong thesis. Conduct targeted research in your area of interest to formulate your research question. Be as specific as possible here, since it adds to the credibility of your research. Your research question should display the amount of research you’ve undertaken. 

As a continuation of the climate change thesis statement example we’ve cited above, a pertinent research question would be along these lines: “How does climate change affect different countries in the world?

#2 Create a tentative thesis statement.

Answer your research question and shape it into a broad statement that sums up your topic. This should give you the first draft of the thesis statement outline wherein multiple changes will definitely be in order. 

A lot of effort goes into drafting your tentative thesis statement. You need to locate a general your area of interest and then conduct precise research activities. Revisit your tentative thesis statement and revise it as you invest more time, research, and resources in the project.

If your assignment requires you to argue a certain take on the subject, you’ll have to sharpen your tentative thesis with the help of evidence. Here’s such a thesis statement example for an argumentative essay: “The proletarian movie, The Grapes of Wrath, perfectly captures the psyche of the American labor class during the Great Depression.”

#3 Supplement reasoning with evidence.

Your tentative thesis serves as a dependable guide to entering the next critical phase of thesis writing. This phase demands the most attention since it requires you to critically engage with already-established literature. You must gather enough relevant information as evidence so you can support your ideas and arguments. 

The more exhaustive the research process is, the more prepared you will be. This is of substantial importance since your academic expertise will come in handy during the viva in which you will be required to firmly defend your arguments. 

So, pursue your research extensively and work hard to make your thesis foolproof. After all, academic work is worth nothing without sound evidence! 

#4 Anticipate counterarguments.

Counterarguments serve a significant purpose: They help you prepare stronger arguments. Anticipating counterarguments is a window into the broader scope of your research and how it fits into the larger discourse.

Counterarguments from your peers, cohort, supervisor, and others provide a learning curve for you as a scholar. You can always filter what aligns with your interest, but having a non-expert colleague can help you better prepare for your presentations and defense. 

Types of thesis statements

Every essay or paper is built upon two essential elements: a topic and an angle. The topic is the subject matter you’re writing about and the angle is your primary idea or opinion on the subject. Based on these, your essay falls under one of three types: expository essay, descriptive essay, or argumentative essay.

Your thesis statement varies depending on the type of essay you’re writing. There are three main types of thesis statements, so let’s go through them one by one. 

#1 Expository thesis

Also known as the explanatory thesis, this type of thesis statement requires you to explain a given opinion, idea, or concept. As the name indicates, this type of thesis applies to expository essays in which you are not required to provide your unique opinion on the matter.  

Thesis structure for expository essays

  1. Introduce the topic.
  2. Explain the categories that best represent the topic.
  3. Determine the order of the categories to present the topic as it is.

Thesis statement example for expository essays

This essay looks closely at Post-traumatic Stress Disorder (PTSD) and the reasons why it increases the incidence frequencies of fibrillation and cardiac stroke.

#2 Analytical thesis

The analytical thesis statement requires you to break down a larger idea into its basic components. You can further analyze the individual components to present the final assessment to your readers.

This thesis statement requires you to present various topics in the order in which your essay discusses them. So, it can apply to both persuasive and descriptive essays.

Analytical thesis structure

  1. Introduce the core element(s) you are analyzing. 
  2. Deconstruct the topic into its constituent categories.
  3. Determine the order of the categories to best represent your findings.

Example of an analytical thesis 

John Steinback’s classic, The Grapes of Wrath, captures the Westward migration of the labor class to the promised land of California during the Great Depression. This paper attempts to revisit the proletarian novel through the political lens of new working conditions, poverty, and social change.

#3 Argumentative thesis

In this type of thesis statement, you make a claim and provide evidence to back it up. These are some common types of claims that you can make in an argumentative thesis statement:

  • Opinion
  • Evaluation
  • Comprehension
  • Cause-and-effect solutions

Naturally, this type of thesis works best for an argumentative essay, where you take a position on your topic and then reason it with substantial evidence.

Thesis structure for argumentative essays

  1. Make your claim.
  2. Present your reasons or pieces of evidence to support the claim.
  3. Determine the order of the categories to best represent your claim.

Thesis statement example for an argumentative essay

The execution of proper legislation that will regulate gun ownership can substantially reduce gun violence in America. Such laws can re-establish the core democratic ideal that freedom is subject to accountability in the purview of public interest. This can significantly reduce the fatality rate as a result of open mass shootings, suicides, and domestic abuse.

Examples of a strong thesis statement

As academic editors, the most common type of queries we come across are in essays about global warming and climate change. So, we’ll demonstrate how you can write a strong thesis statement on these topics.

In the table below, you’ll find some examples of strong thesis statements compared to weak ones. Compare the two to understand how to write a thesis statement that perfectly sums up your take on the subject.

To sum up: place the thesis statement toward the end of your introduction, state your angle on the topic, and provide your reasoning with evidence. Since you only get 20–50 words to work with, make sure to use them wisely!

Keep reading with more resources from your loyal editors and proofreaders:

Chicago Title, Cover Page & Body | Paper Format Guidelines

The Chicago Manual of Style is used widely in academic writing across sciences, social sciences, and humanities. In this article, we will explore the Chicago style format in detail. Read on to learn about how to format a Chicago title page, headings, block quotes, and body text. 

What is the Chicago style format? 

The Chicago Manual of Style, also known as CMOS or CMS, is a set of guidelines devised by The University of Chicago Press, originally in 1906. The latest CMS guidelines are currently compiled in the official handbook’s 17th edition, which was released in 2017. 

Why is CMOS used? 

The Chicago Manual of Style format is frequently used by editors, publishers, and researchers around the world because of its comprehensive style and versatile applicability. The guide has extensive notes on manuscript preparation and formatting, and two types of citation styles. It is focused on American English writing conventions.

The Chicago style format is widely used for its applicability across a wide range of documents and academic disciplines, especially the humanities and social sciences. 

What is CMOS used for? 

The Chicago style format is used in a variety of documents, ranging from journal articles to books. It is a commonly used style for many technical and academic publications, as well as some trade books. Some social science journals in North America have also adopted the Chicago format as their choice of style guide. 

The Chicago Manual of Style primarily focuses on manuscript formatting for books and journals. While formatting internal academic submissions like term papers, graduate theses, and dissertations, the Turabian format is followed instead. 

Page formatting for a Chicago style paper

The official Chicago style guide does not provide strict guidelines in great detail, but it does stress the importance of consistency in style. In other words, Chicago guidelines cover some basic aspects of formatting and leave the rest to the researcher. So make sure to always check with your professor for the official university guidelines. 

Follow these basic guidelines to format a Chicago style paper:

  • Maintain a one-inch margin on all sides of the page. 
  • Choose a commonly used font size and style. The recommended font is Times New Roman 12 pt. 
  • Double-space all the text in your document, including lists, extracts, footnotes and endnotes, and bibliographies. 
  • Insert a half-inch indent at the beginning of each paragraph. 
  • Insert a half-inch indent to separate block quotations from paragraphs. 
  • Insert page numbers in the running header on the top right corner of every page, barring the title page (if there is one). 
  • Ensure all text is aligned to the left; do not “justify” the text. 
  • Leave one space after every concluding punctuation mark in a sentence, unless your instructor specifies otherwise. 
  • Begin every chapter on a new page, starting with the chapter title. 
  • Begin subheadings on a new line, flush left. Distinguish levels of headings and subheadings using the font size. 
  • Use headline-style capitalization for headings and subheadings. 
  • Ensure all chapter titles, headings, and subheadings match their corresponding entry in the table of contents. 
  • Add a half-inch hanging indent for each entry in the bibliography. 

Chicago 17 Paper Format

1. Chicago title or cover page

The Chicago style format does not officially mandate that you include a cover page in your paper. However, your university’s formatting guidelines may require you to include one in your dissertation or other academic documents. In this case, we’ll tell you how to create a Chicago title page for your document.

Follow these guidelines while creating a Chicago style title page: 

  • Add the Chicago title in the middle of the page. 
  • Type out your full name directly under the title. 
  • Add the name(s) of your professor(s), the course title, and the date of submission in three separate lines and place them in the bottom center of the page, as shown below. 
  • Maintain the same font style and size you’ve used throughout your paper (preferably Times New Roman 12 point). 
  • Avoid embellishments like bold typeface, italics, and unconventional fonts. 
  • Do not add a page number to the title page.

A Chicago title page or cover page with formatting guidelines.

2. Table of contents 

A Chicago style paper (or longer documents like dissertations) may require a table of contents. Check your university guidelines for the exact format. If the university hasn’t prescribed you any format, you may create a Chicago style table of contents.

Here are some guidelines you can follow while creating a Chicago style table of contents: 

  • Start the table of contents on a new page. 
  • Center-align the title “Contents” at the top of the page. 
  • Leave a space of two lines between this title and the first item of the table.  
  • Add chapter titles, headings, and subheadings in the same order as seen in your paper. 
  • Ensure that capitalization and hierarchy of titles/headings match the paper.  
  • Place page numbers flush right, with leader dots linking the number to the title. 

3. Headings 

The Chicago format handbook sets some basic guidelines on how to set headings and subheadings in a paper or book. However, these guidelines are more a matter of convention than stringent rules, so you should check with your instructor or publisher to find out the exact Chicago title and heading conventions.

Follow these guidelines to format your Chicago style headings: 

  • Use headline capitalization rules for chapter titles. 
  • Ensure you match each title to its corresponding numbered entry in the table of contents. 
  • Set a new subheading in a new line, flush left. 
  • Distinguish the hierarchy of subheadings using different font sizes (higher-level headings in a larger size and vice versa). 
  • Use headline-style capitalization for subheadings. 
  • In the case of run-on subheadings, italicize the subheadings and follow with a period before beginning the next sentence. 

Here are some Chicago style heading examples: 

Literature review

Literature Review

Methodology of research

Methodology Of Research

Methodology of Research

4. Figures, illustrations, and tables

Using visual aids such as figures, illustrations, tables, graphs, and so forth is a great way to provide additional context for your research.

Follow these guidelines to format visual or non-textual sources according to the  Chicago format: 

  • Present a figure or table as soon as possible after the first time you have referenced or described it in the text. 
  • Use arabic numerals to number the figures in the text (Example: Figure 1, Figure 2, Figure 3). 
  • Add a caption below the figure or table, explaining its contents in a phrase or 1-2 lines. . 
  • If your caption is an incomplete sentence, style it in sentence case without punctuation marks. 
  • Present titles of works of art in headline capitalization style. 
  • Separate the illustration number from the rest of the caption. (The demarcation is usually marked by a period, but check with your instructor for the exact guidelines.)
  • Wherever applicable, add a credit line containing the bibliographic information of the illustration. 
  • Place the credit line in parentheses, right after the concluding punctuation mark of the caption. 
  • If you have listed the work in the bibliography, include only its shortened form in the credit line. 
  • When you include graphs, tables, and charts, ensure consistent style in typography and graphic elements. 

A note regarding the numbering of figures: 

Check with your instructor about the nomenclature you should use while numbering figures and tables in a Chicago style paper. While the Chicago style format specifies you use arabic numerals, it has distinct guidelines about labeling continuous and separate numbering, as well as double numeration (For example: Figure 12.8). This is particularly useful when you have a series of images or an illustration in parts. 

5. Numbers, abbreviations, and acronyms 

The Chicago style format emphasizes consistency while writing numbers, abbreviations, and acronyms. Follow these guidelines to format numbers and names under the Chicago format: 

  • Use the full names of people and organizations when you introduce them for the first time.
  • If you intend to use an abbreviation or acronym thereafter, include it in parentheses next to the first instance of its full form. 
  • Refer to people by their last names after their first introduction.

Example: 

The North Atlantic Treaty Organization (NATO) was founded in 1949. Since its inception, NATO has been instrumental in brokering peaceful relations between countries around the world. 

Hedy Lamarr first arrived in America in 1938… besides her prolific career in Hollywood in the 1940s, Lamarr’s legacy is far beyond the confines of the industry.

  • Spell out whole numbers from zero to one hundred. 

Example: 

The early committee has only 4 members…

The early committee has only four members…

Note: While this is a general guideline followed for formatting numbers, you should check with your instructor or publisher for exact guidelines for numbering conventions. 

6. Block quotations 

According to the Chicago style format, you can include quoted text in two ways: it can be within the text or can be set off as a block quotation. Block quotations are generally reserved for longer excerpts of prose or poetry. 

The deciding factor for what you should set off as a block quote is usually the length of the quoted text. The Chicago format guide recommends setting off text of 100 or more words (or 5 or more lines) in a block quotation. Two or more lines of poetry can be set off as a block quote. 

Here are your guidelines for the Chicago block quotes format: 

  • Set the block quote in a new line, with a half-inch indent.
  • Do not enclose the quote with any quotation marks.
  • While including excerpts from poems, maintain line breaks set in the original verse. 
  • Do not double-space the block quotations. 

See below for an example of a block quote in the Chicago format:

An example of a Chicago block quote.


As your academic editors and proofreaders, we want you to do your best with your Chicago format papers. To learn more about how to arrange your manuscript according to CMS guidelines, head over to our article about citations and references in the Chicago style format.

Here are some related articles that you might find interesting:

How to Copyright Your Book?

If you’ve thought about copyrighting your book, you’re on the right path.

Explore more