Have you ever found yourself in the middle of a document review, grappling with feedback from multiple colleagues? Or perhaps you’re working on a manuscript and need to manage revisions from various contributors? Microsoft Word’s “Track Changes” feature is a powerful tool designed to make collaborative editing seamless.
Let’s learn what are Track Changes in MS Word, and how can you effectively use them to streamline your editing process!
Get your MS Word documents edited by professionals!
What are Track Changes in Word?
Track changes in Word is a built-in feature that records every edit made to a document. From deletions to additions and formatting adjustments, it captures it all. It’s a digital paper trail of who did what and when making it indispensable for document editing and collaboration.
Picture yourself working on a report alongside multiple stakeholders. With track changes, every contributor can make edits that are easily identified and credited. This openness guarantees that revisions can be examined, approved, or declined by the document owner or other collaborators, ensuring a strong grip on the result.
How to turn on Track Changes in Word
Getting started with this feature is straightforward. To turn on track changes in Word, simply navigate to the “Review” tab on the ribbon. Here, you’ll find the “Track Changes” button. Click it, and you’ll activate the tracking feature. You can also use the same button to turn off tracking changes in Word. Alternatively, you can use the keyboard shortcut Ctrl + Shift + E to toggle the Track Changes feature on or off.
Once it’s activated, any change you make to the document will be highlighted. This includes text insertion, deletion, and even formatting changes. Each contributor’s changes may appear in a different color, making it clear who made which edits.
Step 1: Open your document and locate the review tab
Firstly, open your Word document. Ensure you have the document where Track Changes have been made. On the Ribbon at the top of the Word window, click on the “Review” tab. This tab contains all the tools you need for reviewing documents, including everything related to Track Changes.
Step 2: Enable Track Changes (if not already enabled)
If Track Changes is not already enabled, you can turn it on to start tracking changes from this point onward. To view existing changes, it doesn’t need to be turned on. However, to ensure that you can see all changes made by others before you received the document, it’s good to check if Track Changes is active:
Look for the “Track Changes” button in the “Tracking” group on the Review tab.
Click on the “Track Changes” button to toggle it on or off. When it’s highlighted, it’s active.
Step 3: Use the display for review options
Within the “Tracking” group, you’ll find a dropdown menu called “Display for Review.” This controls how tracked changes and comments are displayed. You have several options:
Simple Markup: This shows the final version without inline markups; changes are indicated with a red line in the margin.
All Markup: This displays all edits with inline markups, such as strikethroughs for deletions and underlining for additions.
No Markup: This displays the document as it would appear with all changes accepted, hiding the tracked changes.
Original: This shows the original document before any changes were made.
Step 4: Navigate through the changes
To review each change one by one:
Use the “Next” and “Previous” buttons in the “Changes” group to jump from one edit to the next.
As you select each change, you can choose to accept or reject it immediately if you are in the process of reviewing.
If you want to customize what types of changes are displayed or hidden:
Click on “Show Markup” in the “Tracking” group.
You can choose to show or hide “Comments”, “Ink”, “Insertions”, “Deletions”, “Formatting”, and specific “Reviewers” if there are multiple collaborators.
Step 6: Reviewing changes
As you go through the document, you can add, delete, or reply to comments if needed. To do so, right-click on the comment and choose the appropriate action.
Step 7: Balloons
Word also gives you the option to view changes in balloons in the margins of the document. To use this feature:
Go to “Show Markup” and hover over “Balloons.”
You can choose “Show Revisions in Balloons” to display changes in the margin, which can make the document easier to read if there are many changes.
Step 8: Print with Track Changes
If you need a physical copy of the document with all changes and comments:
Go to “File” and then “Print.”
In the “Print” settings, you can choose to print “All Pages” with “List of Markup” to have all tracked changes and comments printed alongside your document.
Step 9: Finalizing the document
Once all changes have been reviewed, you may want to finalize the document by accepting all changes:
Click on the “Accept” dropdown in the “Changes” group and choose “Accept All Changes.”
How to use track changes in Word
To provide feedback in the document without altering the text, select the text you wish to comment on using your mouse, then click on “New Comment” located in the “Review” tab. This action will generate a bubble in the document margin, displaying your name and an assigned color. Once the comment bubble appears, simply type your feedback.
For responding to a comment, click on “Reply” attached to the comment you wish to address, and enter your response. You can exit the comment bubble by clicking anywhere outside of it once you’ve finished.
To examine all the modifications made to your document in a systematic manner, you can utilize the “Reviewing Pane”. Located beside the Track Changes button, simply click “Reviewing Pane” to access it. Depending on your screen layout preference, you can opt for either the “Vertical” or “Horizontal” positioning of the pane.
Once selected, the “Reviewing Pane” will emerge, displaying a comprehensive list of all alterations and comments within the document. Additionally, the total count of changes will be visible at the top of the “Reviewing Pane”. To exit the Reviewing Pane, simply click “Reviewing Pane” again.
How to hide Track Changes in Word
Sometimes, you may want to hide track changes in Word for a cleaner view as you edit. To do this,
Go to the “Review” tab, and in the “Tracking” group, click on “Show Markup.”
Here you can choose to hide various types of markup like comments, formatting, and specific reviewers’ changes temporarily without removing them.
How to remove Track Changes in Word
After reviewing edits, you might wonder how to remove Track Changes in Word. Accepting all changes is the most straightforward method to clean up the document. However, to ensure no traces remain, you might need to inspect the document. Go to “File,” select “Info,” then click on “Check for Issues” and choose “Inspect Document.” This will remove any hidden metadata associated with the changes.
How to disable Track Changes in Word
If you’re looking for a way to prevent further changes from being tracked, you can lock the feature by clicking on “Track Changes” and selecting “Lock Tracking.” This will require a password to turn tracking on or off, ensuring that no changes go unmonitored.
Now that you’ve got the lowdown on enabling, utilizing, and clearing track changes in Word, you’re all set to tackle any document revisions like a pro. So, dive into your next group project with gusto, knowing that Track Changes from Microsoft Word will have your back every step of the way.
If you ever need an extra set of eyes to polish your document to perfection, don’t forget about PaperTrue’s expert editing and proofreading services. Our team of professionals is here to help make your writing shine!
Writing an email is often the first line of communication in the professional space. Whether you’re writing an email to a professor, crafting a follow-up email after an interview, or penning your resignation, the way you articulate your message can make a significant difference.
Email writing skills are indispensable, and with the advent of email writing AI, the task has become more manageable and effective. Today, let’s delve into how you can leverage these tools and tips to excel in professional email writing!
Achieve high-quality text without any errors!
What is a professional email and why is it important to know how to write one?
A professional email is a form of written communication that is used in a business or formal setting. It’s important to use clear and concise language, a formal tone, and a structured format. The email should include a subject line, greeting, main message, and closing. These emails are commonly used for making requests, sharing information, coordinating tasks, or keeping in touch with colleagues, clients, and others in a professional setting.
Knowing how to write a professional email is essential because it reflects on your credibility and professionalism. A well-written email can promote effective communication, strengthen relationships, and help tasks get done quickly. On the other hand, a poorly written email can cause misunderstandings, damage your reputation, or result in missed opportunities.
Email writing skills and etiquette
When writing email messages, employees should remember that emails are a permanent record. Use polite language, avoid slang, and always consider how the email reflects on your professional reputation. Email writing etiquette also means respecting the recipient’s time—be concise and to the point.
1. Be clear and concise: Get straight to the point without unnecessary explanations.
2. Maintain a professional tone: Use formal language, but avoid sounding too rigid or distant. Phrases like “I’m writing to inform you” or “I’d like to request” are suitable.
4. Proper use of CC and BCC: When sending a copy to your supervisor, use the CC field. For mass emails where privacy matters, use BCC.
5. Professional follow up mails: After sending your initial email, crafting a polite and well-structured follow-up mail can ensure effective communication and avoid misunderstandings.
How to write a professional email
Sending a professional email requires careful attention to detail, adherence to business standards, and a clear grasp of your message. Follow these step-by-step instructions to compose a successful professional email:
1. Start strong with a clear subject line
The subject line should be a concise summary reflecting your email’s content. Since it’s often the first thing the recipient sees, make it impactful. Ensure it informs the recipient of the email’s purpose without needing to open it.
2. Use a polite salutation
Begin with a courteous greeting. If possible, use the recipient’s name and double-check the spelling. If uncertain, generic salutations like “Dear Sir/Madam” or “To Whom It May Concern” can suffice, even though it’s less personalized.
3. Introduce yourself if necessary
If the recipient doesn’t know you, briefly introduce yourself and your position, or explain your relation to the subject matter.
4. Get straight to the point
Clearly state the purpose of your email early on. For example, in a follow-up email after an interview, mention the interview date and position to jog the recipient’s memory.
5. Provide relevant context and detail
Elaborate on your main point, providing all necessary information concisely yet thoroughly. For example, when emailing your boss, include relevant details that may influence their decision or feedback.
6. Mind your tone and language
Maintain a consistently professional tone. Use complete sentences, and proper grammar, and avoid slang or jargon the recipient may not understand. Choose words that convey respect and competence without being overly complex. You can take the help of language correctors if required.
7. Include a clear call to action
Clearly state what action you expect the recipient to take after reading your email. Whether it’s providing information, scheduling a meeting, or giving feedback, make your request easy to understand.
8. Conclude professionally with a signature
End your email with a professional closing like “Best regards” or “Sincerely,” followed by your full name, title, and contact details. For business emails, you may also include your company name and address.
Begin with a greeting, state your purpose, provide necessary details, and conclude with a call to action.
Subject: Meeting Request – Q2 Marketing Strategy
Dear Mr. Smith,
I am writing to schedule a meeting to discuss our Q2 marketing strategy. Could we arrange a meeting next week?
Best regards,
[Your Name]
[Contact Details]
2. Writing a formal email
Maintain a respectful tone throughout and sign off formally.
Subject: Inquiry About Research Opportunities
Dear Professor Johnson,
I am deeply interested in your work on climate change and would like to inquire about research opportunities within your team.
Sincerely,
[Your Name]
[Contact Details]
3. Writing a resignation email
Keep it professional and gracious, no matter the circumstances.
Subject: Resignation Notice
Dear [Manager’s Name],
I am writing to formally resign from my position at [Company Name], effective two weeks from today. I appreciate the opportunities for growth during my tenure.
Best regards,
[Your Name]
[Contact Details]
What should you avoid using when writing a formal email?
Informal or overly relaxed language.
Emoticons or too much punctuation.
Jokes that may be misunderstood.
Disclosing confidential information without consent.
To assist you further, here are a few professional email templates for common scenarios:
Professional email templates
1. Template for a follow-up email after an interview
Subject: Expressing Gratitude for the Interview
Dear [Interviewer’s Name],
I wanted to express my sincere gratitude for the opportunity to interview for the [Position] role on [Date]. It was a pleasure to learn more about the team and the excellent work you do at [Company Name].
I am very enthusiastic about the possibility of joining your team and contributing to [specific company project/initiative you discussed in the interview].
Please feel free to reach out if there are any additional details I can provide. I look forward to the possibility of working together.
Thank you once again for your time and consideration.
Warm regards,
[Your Full Name]
[Your Contact Information]
2. Template for writing a resignation email
Subject: Resignation Notice
Dear [Manager’s Name],
I am writing to formally announce my resignation from my position as [Your Position] at [Company Name], effective [Last Working Day, typically two weeks from the date of the email].
I have greatly appreciated the opportunities for professional and personal development that you have provided me during my time at the company. It’s been a pleasure working with the team and contributing to the company’s goals.
Please let me know the preferred procedures for the transition period. I am willing to assist in any way to ensure a smooth handover of my responsibilities.
Thank you again for the opportunity to work at [Company Name]. I look forward to staying in touch and hope our paths cross again.
Best regards,
[Your Full Name]
[Your Contact Information]
3. Template for writing a professional email to a professor
Subject: Inquiry About [Course Name] Syllabus
Dear Professor [Last Name],
I hope this email finds you well. My name is [Your Full Name], and I am enrolled in your [Course Name] course this semester.
I am writing to ask for further clarification on the topic of [specific topic] that you covered in class on [Date/Week]. I’ve reviewed the relevant materials in the syllabus, but I still have some questions about [specific question].
Could we possibly arrange a time to discuss this in your office hours, or would you prefer to address it via email?
Thank you for your time and assistance.
Sincerely,
[Your Full Name] [Your University ID]
[Your Contact Information]
AI for email writing can be a valuable tool, helping to suggest phrasing or paraphrasing, correct grammar, and even ensure that the tone is appropriate for the context. However, it’s essential to review any AI-generated suggestions to ensure they align with your intended message.
In addition, for those seeking further assurance of polished and professional emails, consider leveraging the expertise of PaperTrue’s editing and proofreading services. Our team of skilled editors can refine your email to perfection, ensuring clarity, correctness, and professionalism in every communication!
Welcome to our comprehensive guide on sampling methods! If you’re curious about how researchers gather data and draw meaningful conclusions, you’ve come to the right place. Sampling is a crucial aspect of research and data analysis, allowing us to select a subset of individuals or elements from a larger population.
It is also very important to mention the sampling strategy that you use, in your research methodology section. In this guide, we’ll explore different sampling methods, and strategies, and provide real-life examples to help you understand and apply these techniques effectively!
Achieve academic excellence with our professional editing services!
Sampling methods are techniques used by researchers to select a smaller group of individuals or elements from a larger population. It’s like taking a small portion of something to represent the whole. Sampling methods help researchers collect data more efficiently and cost-effectively.
They allow us to study a subset of the population and draw meaningful insights without having to survey or observe every single individual or element. So, in a nutshell, sampling methods are tools that researchers use to choose a representative group from a larger population, making it easier to study and draw conclusions about the whole.
Sampling Frame
A sampling frame is a list or database of all the members of a population from which a sample can be drawn. The sampling frame is crucial because it helps ensure that every member of the population has a chance of being selected for the sample.
For example: Imagine you want to conduct a survey about the favorite ice cream flavors among students in your school. To do this, you need a list of all the students enrolled in the school. This list is your sampling frame. From this sampling frame, you can then select a subset of students who will participate in your survey. This subset is your sample.
Advantages of using sampling methods
Using sampling techniques in research and statistics offers several advantages. Here are some of the key benefits:
1. Efficiency: Sampling saves time and resources compared to studying an entire population.
2. Cost-effectiveness: Collecting data from a smaller group reduces expenses.
3. Feasibility: Sampling makes research possible when studying large or inaccessible populations.
4. Accuracy: Well-designed samples provide representative data for drawing valid conclusions.
5. Timeliness: Sampling enables faster data collection and analysis for timely decision-making.
6. Detailed information: Focusing on a smaller sample allows for more comprehensive data collection.
7. Flexibility: Different sampling techniques accommodate various research needs and populations.
A population is the entire group of individuals, objects, or events that you want to study or make conclusions about. It includes all members of a defined group.
On the other hand, a sample is a smaller subset of the population that is selected for study. It is a portion of the population that is used to represent the entire group.
For example:
Imagine you have a big jar full of candies of different colors. The jar with all the candies is the population. If you take a handful of candies from the jar, that handful is your sample. You can use the sample to make estimates or draw conclusions about the characteristics of all the candies in the jar (the population) without having to examine each and every candy.
In research and statistics, various types of sampling methods are used because it is often impractical, time-consuming, or impossible to study the entire population. By studying a representative sample, researchers can make inferences and generalizations about the larger population.
Sample size
A sample size refers to the number of individuals or observations included in a sample, which is a subset of the entire population being studied.
For example: Imagine you have a bag containing 100 marbles of different colors. The bag with all the marbles is your population. Now, you want to estimate the proportion of blue marbles in the bag. You reach into the bag and randomly pick out 10 marbles. The number of marbles you picked (10) is your sample size. Based on the colors of these 10 marbles, you can make an estimate of the proportion of blue marbles in the entire bag.
Sampling strategies and types
Probability sampling
Probability sampling methods are ways to choose a sample from a population in a fair and unbiased manner. These methods make sure that every person or thing in the population has an equal chance of being picked for the sample.
Think of it like a lottery. In a lottery, every ticket has the same chance of being drawn. Similarly, in probability sampling, every individual in the population has the same chance of being selected for the sample.
Types of probability sampling methods
Simple random sampling
Let’s start with the basics – simple random sampling. In this method, every individual in the population has an equal chance of being selected for the sample. It’s fair, and unbiased, and ensures that everyone gets a chance at being included.
For example:
To select a sample of 10 students from a class of 50 students, you can use simple random sampling:
a. Number each student from 1 to 50.
b. Use a random number generator or draw numbers from a hat to select 10 numbers.
c. The students corresponding to the selected numbers will be the sample.
d. Every student in the class had an equal probability of being chosen for the sample, and the selection was made randomly.
Stratified sampling
Stratified sampling involves dividing the population into distinct subgroups or strata based on certain characteristics. Then, we select a proportional number of individuals from each stratum to form the sample. This method ensures that our sample reflects the diversity within the population and allows for more accurate analysis within each subgroup.
For example:
Imagine you have a box of 100 toys. The box contains three types of toys: 50 cars, 30 dolls, and 20 puzzles. You want to select a sample of 20 toys from the box to estimate the proportion of each type of toy in the entire box.
To do stratified sampling, you would:
a. Divide the toys into three strata (subgroups) based on their type: cars, dolls, and puzzles.
b. Calculate the proportion of each stratum in the sample. Since you want a sample of 20 toys, and the box has 100 toys, you’ll select 20% of each stratum:
Cars: 50 × 20% = 10 cars
Dolls: 30 × 20% = 6 dolls
Puzzles: 20 × 20% = 4 puzzles
c. Randomly select the calculated number of toys from each stratum:
Randomly pick 10 cars from the 50 cars
Randomly pick 6 dolls from the 30 dolls
Randomly pick 4 puzzles from the 20 puzzles
d. Combine the selected toys from each stratum to form your stratified sample of 20 toys.
Systematic sampling
In systematic sampling, we start with a random starting point and then select every ‘nth’ individual from the population. This method is relatively easy to implement and provides a representative sample when there’s no specific pattern or order in the population.
For example:
Imagine you have a shelf with 100 books arranged in a row. You want to select a sample of 10 books from the shelf to estimate the average number of pages in all the books.
To do systematic sampling, you would:
a. Determine the sampling interval by dividing the population size by the desired sample size. In this case, 100 books ÷ 10 books = 10.
b. Choose a random starting point between 1 and the sampling interval (10). Let’s say you randomly pick the number 4.
c. Select every 10th book starting from the 4th book until you have a sample of 10 books.
Cluster sampling
In cluster sampling, we divide the population into clusters or groups, and instead of selecting individuals, we randomly choose entire clusters to be included in the sample. Cluster sampling can be more cost-effective and time-efficient, especially when dealing with large populations.
For example:
Imagine you are a school administrator, and you want to survey students about their favorite subject. The school has 1000 students divided into 50 classrooms of 20 students each. Instead of surveying all 1000 students, you decide to use cluster sampling.
To do cluster sampling, you would:
a. Define the clusters: In this case, each classroom is a cluster, so there are 50 clusters in total.
b. Randomly select a sample of clusters: Let’s say you decide to select 5 classrooms (clusters) out of the 50. You can use a random number generator or a hat to randomly pick 5 numbers between 1 and 50, corresponding to the classroom numbers.
c. Include all members of the selected clusters in your sample: If the randomly selected classrooms are 3, 12, 27, 35, and 48, you would survey all 20 students in each of these classrooms.
d. Your final sample size would be 100 students (5 classrooms × 20 students per classroom).
In non-probability sampling, the researcher chooses who to include in the sample based on their judgment or what is easy for them, rather than using random selection where everyone has an equal chance.
This means that the sample might not fairly represent the entire population, and the results of the study might not apply to everyone. However, non-probability sampling can still be helpful in some situations and can provide useful information for the researcher.
Types of non-probability sampling methods
Purposive sampling
In purposive sampling, we select participants based on specific criteria or characteristics that are relevant to the study. It’s like handpicking individuals who can provide valuable insights and information related to our research objectives. This method is commonly used in qualitative research or when studying a specific subgroup within a population.
For example:
Imagine you are doing a research project on the challenges faced by students with visual impairments in your school. You want to interview some students to get their perspectives and experiences.
To do purposive sampling, you would:
a. Define the specific characteristics or criteria that are important for your study. In this case, you are looking for students who have visual impairments.
b. Purposefully select individuals who meet these criteria. You would reach out to the school’s disability services office or teachers to help identify students with visual impairments who might be willing to participate in your study.
c. Choose the students who you believe will provide the most relevant and valuable information for your research. For example, you might select students from different grade levels or with varying degrees of visual impairment to get a diverse range of perspectives.
d. Continue selecting participants until you have enough information to answer your research questions or until you reach saturation (when new interviews stop providing new insights).
Snowball sampling
In snowball sampling, we start with a small number of individuals who meet our criteria and ask them to refer other potential participants. It’s like creating a snowball effect as more participants join the sample. Snowball sampling is often used in studies involving hard-to-reach populations, such as individuals with rare diseases or marginalized communities.
For example:
Imagine you are conducting a study on the experiences of international students at your university. You want to interview some international students to learn about their challenges and successes.
To do snowball sampling, you would:
a. Start with a few initial participants who meet your criteria (in this case, being an international student). These initial participants are often called “seeds.”
b. After interviewing the seeds, ask them to refer other international students they know who might be willing to participate in your study. This is where the “snowball” effect comes in – your sample grows as each participant refers to others.
c. Contact the referred students and invite them to participate in your study. If they agree, interview them and then ask them to refer other international students they know.
d. Continue this process of interviewing and asking for referrals until you have enough participants to answer your research questions or until you stop getting new referrals.
Quota sampling
Quota sampling is a non-probability sampling technique that involves selecting individuals based on pre-defined quotas or characteristics. In quota sampling, the researcher identifies specific characteristics or traits that are relevant to the study. These characteristics could be demographic factors like age, gender, occupation, or any other relevant criteria. The researcher then sets quotas for each characteristic, specifying the desired number of participants to be included in each category.
For example:
Imagine you are surveying favorite pizza toppings in your neighborhood. You want to make sure that your sample includes equal numbers of men and women to get a balanced perspective.
To do quota sampling, you would:
a. Define the key characteristics (quotas) that you want to be represented in your sample. In this case, you want equal numbers of men and women.
b. Determine the total sample size you want. Let’s say you want to survey 100 people.
c. Divide the total sample size by the number of quotas to determine how many participants you need for each quota. In this case, you need 50 men and 50 women.
d. Once you have surveyed 50 men, you stop surveying men and focus on finding women to survey until you reach 50 women.
e. Once you have 50 men and 50 women, your quota sample is complete.
Convenience sampling
Convenience sampling, also known as accidental or grab sampling, involves selecting individuals who are readily available and easy to include in the sample. However, convenience sampling may introduce bias and may not accurately represent the population as a whole. So, tread carefully when interpreting the results.
For example:
Imagine you are a student doing a project on the reading habits of your classmates. You need to collect data quickly and don’t have a lot of time or resources.
To use convenience sampling, you would:
a. Decide to survey the people who are most accessible and easy for you to reach. In this case, you might choose to survey your friends, classmates sitting near you, or people you see in the library.
b. Approach these people and ask if they are willing to participate in your survey.
c. If they agree, have them complete your survey about their reading habits.
d. Continue surveying people until you feel like you have enough data for your project or until you run out of time.
Voluntary response sampling
Voluntary response sampling, also known as self-selection sampling is a non-probability sampling technique where individuals self-select or volunteer to be part of the sample. In voluntary sampling, participants have the freedom to decide whether or not they want to be included in the study.
Researchers typically advertise or make the opportunity to participate known, and individuals who are interested or motivated to be part of the study voluntarily come forward. This type of sampling is commonly used in surveys, online questionnaires, or studies where individuals can choose to participate based on their willingness or interest.
For example:
Imagine you are a researcher interested in studying the experiences of people who have adopted a vegan lifestyle. You want to gather data through an online survey.
To use voluntary sampling, you would:
a. Create an online survey about the experiences of being vegan.
b. Promote the survey through various channels, such as vegan social media groups, and vegan forums, or by asking vegan friends to share the survey link.
c. In your survey promotion, clearly state that you are looking for vegans to voluntarily participate in your study.
d. As people come across your survey invitation, they can choose to click on the link and complete the survey if they are interested and meet the criteria (being vegan).
e. Collect responses from those who voluntarily completed the survey.
Sampling methods play a crucial role in research and statistics, allowing us to gain valuable insights from a smaller subset of the population. By efficiently selecting representative samples, researchers can save time, reduce costs, and still obtain accurate and meaningful results.
So, as you embark on your research journey, remember the power of sampling methods in unlocking valuable insights. And don’t forget to give your work the final polish it deserves with the help of expert editing and proofreading services, like PaperTrue. Happy researching!
Bring your story to life with the best setting generators! Whether you wish to describe castles, dungeons, scary sites, cities, or anything else, these setting generators will help. If you want maps or unique names for your setting, we’ve got you covered!
We’ve also included free setting generators to ignite your creativity. So without further delay, let’s jump into the details!
Refine and make your story setting memorable for your readers!
Here are the top 10 setting generators of 2024:
1. Donjon
Donjon provides an exciting fantasy setting generator. Using this generator, you can get a map of an entire fictional world with a list of cities and castles.
Donjon can give you ideas for describing dungeons, magic shops, random inns, towns, and treasure maps. It also has options to change details such as the town size, topography, and race if required. For science fiction writers, Donjon also provides a SciFi World Generator.
2. Chaotic shiny
Whether you want can create a medieval city, bazaar, map, or combat terrain, Chaotic Shiny can do it for you! It has an intriguing civilization generator. To use this, you need to select from time options (“Ancient”, “Medieval”, “Modern”, “Near Future”, and “Far Future”).
It can also provide setting descriptions of planets, portals, and taverns. With this, it also provides a setting mashup generator. Using this generator, writers can generate 1-25 setting descriptions at a time.
3. Springhole
Springhole has various tools that you can use like an Earthlike planet/ world generator, a Fantastic Realm Generator, a Fast Food Restaurant Generator, and a House Generator. Springhole also has an interesting horror setting generator named Creepy Site Generator.
It also provides unique generators to describe lost civilizations, magic schools, parks, rooms, spaceships, towns, and stores. To use this tool, select the random story setting generator, and choose the option to generate the setting.
4. Seventh Sanctum
Using Seventh Sanctum, you can create an engaging story setting for adventure sites, lost civilizations, kingdoms, rooms, locations, or tavern names. This random setting generator also provides intriguing names for kingdoms, dungeons, castles, and towers.
You can use Seventh Sanctum to give 1-25 setting prompts at a time. This book setting generator also allows you to choose from various genres such as fantasy, horror, and sci-fi.
This random story-setting generator can help you to create entire continents! All you need to do is select the option ‘Generate’. RanGen will then provide you with the continent’s name, surrounding areas, winds, seas, and whether it has plants and animals.
This worldbuilding generator can also help you to create cities, countries, fantasy races, planets, solar systems, and species. It also provides maps for visualizing settings.
Now let’s explore the next fictional setting generator!
6. Fantasy Name Generators
With 50+ description generators, Fantasy Name Generators is one of the best tools for creating a setting. You can use this generator to get setting ideas about cities, forests, gardens, houses, ghost towns, farms, and countries.
All you need to do is select the generator and choose the option ‘Get a description.’ Fantasy Name Generators will then provide you with a detailed description.
7. Kassoon
Kassoon can help you create interesting story descriptions for villages, cities, hamlets, and streets. This story-setting generator can also generate descriptions for houses and rooms.
You need to pay $5 for the premium version to get access to detailed descriptions of house rooms. Kassoon also has a random town generator that generates descriptions of the town’s population, defenses, taverns, and shops. Using Kassoon, you can also create maps of houses and villages.
Code Beautify provides a random setting generator. You can also enter the number of settings you want and it will generate the setting accordingly. It gives prompts such as the time of the day, weather, location, and atmosphere. These details can help to brainstorm and develop the themes of a story.
You also have the option to download the settings generated or copy any of them to the clipboard.
9. Writing exercises
This AI setting generator can help writers brainstorm and overcome writer’s block. It has four options: “Time of day”, “Weather”, “Location” and “Atmosphere”. By clicking on any of these options, you can generate a setting prompt related to that option.
This prompt is usually a single sentence. After generating the creative prompts, you can save them to the clipboard.
Now let’s see the next setting generator for stories!
10. WriteCream
WriteCream is a free story-setting generator. To use this tool, type what you wish to be described. WriteCream will then provide you with a 3-5-line description of the topic.
This writing prompt generator also has an “Advanced” option that allows you to input the word count and select from language tones such as professional, friendly, formal, casual, diplomatic, etc. Writecream can also generate story settings in languages other than English like French, Hindi, German Arabic, Russian, etc. To enhance your story further and develop a unique plot, you can also use AI story generators.
Now that you know the best setting generators, you can use them to create unforgettable settings. Once you craft the setting and finish writing your story, you’ll need to carefully edit it. If you want your story to be edited by experts, PaperTrue can help. Established in 2014, PaperTrue provides professional editing and proofreading services for writers and students.
Here are some other articles you might find interesting:
If you’re finding it difficult to craft a thesis statement, we’re here to help! Explore all features of the top 10 thesis statement generators and select the best. We’ve also added free thesis statement generators for you.
Whether you want to write a thesis statement for a persuasive, expository, analytical, compare and contrast, or analytical paper, we’ve got you covered. So without wasting time, let’s begin!
Let our professional editors refine your thesis!
1. Empire State University Thesis Statement Generator
This informative thesis statement generator can give ideas for the following types of thesis statements:
Persuasive thesis statement
Research thesis statement
Compare and contrast the thesis statement
Once you select from these three types, the generator will ask detailed questions. For a research paper, it asks for details about the research question, your research claim, the summary of the research findings, and the possible research title.
To use its persuasive thesis statement generator, input 3 strong reasons to support your claim and the main opinion against your claim. For a compare-and-contrast thesis statement, define the two aspects you are comparing and list their two similarities and differences. It will then generate 3 alternative thesis statements for you.
2. EditPad
To use EditPad’s thesis statement generator, you need to fill in details about your research topic. Then, choose the option ‘Generate’. EditPad will then provide you with 6 alternative thesis statements.
EditPad gives you the option to copy the thesis statements or download them. You can use this free thesis statement generator to write explanatory, argumentative, or analytical thesis statements.
Custom-writing.org provides a simple and effective thesis statement generator. You can write thesis statements for analytical, informative, compare and contrast, and argumentative essays using this free tool.
After selecting from the types of essays, add your essay’s topic, main conclusion, the main argument for this conclusion, and any counterargument. In the conclusion, state your research findings.
4. PapersOwl
PapersOwl’s thesis statement generator is used by thousands of students for academic writing. To generate a thesis statement, describe your topic, and add evidence and any counterarguments for your research claim.
PapersOwl will then generate 3 options for thesis statements from which you can choose. If required, you can also choose the option ‘Paraphrase your thesis’ and edit your thesis statement.
5. Kibin
Known for its essay editing services, Kibin provides an effective argumentative thesis statement generator. After you select the ‘Argumentative Essay option, it asks you to define your topic and stance (For/against). You also need to describe the focus of your essay and two reasons for your stance on the topic.
After filling in the details, select the option “Show me my thesis statement”. Kibin will then generate a thesis statement for you. You can also use this tool to generate thesis statements for compare-and-contrast essays.
6. Grammarly
To use Grammarly’s AI thesis statement generator, fill in details about your paper’s target audience and research topic idea. Then, select the ‘Create thesis statement ideas’ option.
This thesis statement generator will then provide you with 3 thesis statement ideas.
You can copy these ideas and rephrase them to create a finalized thesis statement. However, Grammarly’s generative AI tool is still in beta testing. Hence, it’s better to check whether the thesis statement ideas are accurate.
7. Paraphrasingtool.ai
Paraphrasingtool.ai provides a simple and user-friendly analytical thesis statement generator. All you need to do is create an account and fill in your topic details. The tool will then generate a thesis statement of 2-3 sentences.
You can copy this statement and download it. A con is that, unlike other thesis generators that give various alternative thesis statements, this tool provides only 1 thesis statement.
This informative speech thesis statement generator provides ideas for analytical, argumentative, and expository papers. You need to select from these types of papers and fill in details about your research topic and themes. Then, choose the option ‘Generate Thesis’.
AskYourPdf.com then generates a single thesis statement for you. You also have the option to edit the thesis statement or download it as a PDF.
9. Perfect Essay Writing
This free thesis statement generator provides you with several options for thesis statements within seconds. All you need to do is fill in details such as the topic idea, research claims, evidence to support those claims, and any counterarguments.
Perfect Essay Writing will then generate 6 thesis statement options. You can select the best thesis statement and edit it as per your academic paper requirements. This tool is user-friendly and more accurate as compared to other thesis statement generators.
10. MyEssayWriter.ai
MyEssayWriter.ai’s strong thesis statement generator can provide thesis statements for different types of essays like persuasive, descriptive, analytical, etc. You just need to fill in details such as the topic name, essay type, main argument, supporting argument, and any counterarguments.
Then, select the option ‘Generate ‘ and your thesis statement will be generated. You also have the option to copy the thesis statement or download it.
After understanding the best thesis statement generators, you can use the perfect AI tool to write your thesis statement. However, it’s better to modify the generated statement instead of directly copy-pasting it to avoid detection by AI checkers.
Once you create a thesis statement and complete writing your paper, you’ll need to edit it. As experts in editing and proofreading services, we’d love to help you enhance your academic paper’s quality.
Here are some articles you might find interesting:
In today’s busy world of business, where companies act as both buyers and sellers, B2B writing plays a crucial role. Unlike B2C writing, which aims to grab attention, B2B writing focuses on appealing to professionals who are looking for value and efficiency.
This article explains what B2B writing is, talks about its different types, and offers tips on how to succeed in this field, comparing it to B2C writing and helping aspiring writers understand how to succeed!
Elevate your writing with flawless editing and proofreading!
What is B2B writing?
B2B writing, or business-to-business writing, is the process of creating content aimed at other businesses rather than individual consumers. It’s a type of marketing technique used to convince others, where the words used are more about showing benefits and returns on investment.
B2B writing samples often reflect a tone that is professional, informative, and packed with industry insights. B2B content writing aims to engage, inform, and persuade key decision-makers in companies. It’s different from B2C writing, which targets individual consumers.
While both B2B and B2C content writing aim to engage audiences and drive profitable action, there are key differences:
B2B writing requires a deeper understanding of the industry and the business’s specific needs, while B2C writing often has a broader appeal and is more focused on entertainment and engagement.
Types of B2B writing
B2B writing encompasses a variety of content types, each serving a different purpose in the business buyer’s journey. Below are several types of B2B writing, accompanied by practical examples to illustrate their functions:
1. White papers and eBooks
These in-depth pieces are used to educate the market about a specific technological solution or business strategy, argue a position, or generate leads.
For example:
A cybersecurity firm published an e-book titled “Navigating the Threat Landscape: Strategies for Cyber Resilience.” The e-book covers emerging cybersecurity threats, the importance of resilience strategies, and how their services can mitigate risk.
2. Case studies
Case studies demonstrate the real-world value of a product or service by highlighting customer success stories.
For example:
A B2B marketing agency shares a case study on its website detailing how it increased a client’s lead generation by 200% through a targeted LinkedIn advertising campaign, showcasing the strategies used and the measurable outcomes.
3. B2B blog writing
B2B blog writing involves creating content that engages, informs, and persuades key decision-makers within businesses. Its goal is to drive brand awareness, establish thought leadership, and nurture leads.
For example:
A SaaS company specializing in project management software maintains a blog with regular posts offering insights while subtly promoting the relevance of its software features.
4. Technical guides and manuals
Technical guides instruct users on how to use a product or service effectively or to understand its specifications.
For example:
A company that manufactures industrial 3D printers releases a comprehensive technical manual that explains the setup, operation, and troubleshooting of their latest printer model, targeting technical staff of purchasing businesses.
5. Email campaigns
Professional email campaigns help to nurture leads, keep subscribers informed, and promote products or services.
For example:
A B2B content writing agency creates an email series that provides subscribers with weekly content marketing tips while also highlighting their consultation services and client testimonials.
They concisely convey the features and benefits of a product.
For example:
A solar panel manufacturer prepares detailed product sheets for each model they offer, listing specifications like efficiency, dimensions, warranty information, and the ideal commercial applications.
7. Press releases
Press releases are made to announce new products, services, partnerships, or corporate milestones to media outlets.
For example:
A fintech startup issues a press release announcing a new partnership with a major bank, outlining the scope of the collaboration and the expected benefits for the financial industry.
8. Social media content
Social media content engages with other businesses on social platforms, drives brand awareness, and shares industry-related content.
For example:
An enterprise software provider uses LinkedIn to share short-form articles, infographics about data trends, and commentary on industry news, positioning itself as a knowledgeable industry player.
9. Proposals and RFP responses
Their purpose is to persuade potential clients to choose your company’s products or services by responding to their specific needs.
For example:
A digital transformation consultancy crafts a tailored proposal in response to a Request for Proposal (RFP) from a large retail chain seeking to modernize its inventory management system, highlighting its approach, previous work, and projected outcomes.
10. Scripts for video and podcast content
The purpose of this is to script engaging and informative audio-visual content that can be used for marketing or educational means.
For example:
A logistics company creates a series of podcast episodes discussing supply chain optimization, featuring interviews with their experts and clients, providing insights while promoting their services.
Each type of B2B writing is designed to fulfill a specific role in the marketing and sales strategy, and the best B2B content writing services can adeptly switch between these formats to effectively communicate with a business audience.
Best techniques for B2B writing
1. Understand your audience
Research buyer personas, their challenges, and what motivates their decisions. Speak their language and address their specific needs.
2. Focus on benefits, not just features
Highlight how your solution improves their business, saves time/money, and provides ROI.
3. Establish credibility
Use data, research, examples, and customer proof points to back up claims. Showcase your expertise and results.
4. Tell a story
Use different writing styles and storytelling techniques to make content more engaging and relatable. Focus on the customer as the hero. Make use of content editing tools to make your content better.
5. Keep it clear and scannable
Use short paragraphs, subheadings, bullets, and clear language. Make key information easy to find and digest.
6. Include a strong call-to-action
Guide readers to the next step, whether contacting sales, downloading an asset, or signing up for a demo.
7. Optimize for search engines
Research keywords and use them naturally throughout your content to improve search rankings and visibility with your target audience.
Take courses, read extensively, and practice writing in a clear, persuasive style. Invest in online courses or workshops that focus on business writing. Consume a broad range of writing, from classic literature to contemporary B2B blogs and whitepapers.
2. Learn about business
Understand common concepts like marketplaces, buying processes, profit & loss, etc. Take advantage of free online resources like MOOCs (Massive Open Online Courses) from platforms like Coursera or edX that cover business fundamentals. Regularly follow business news outlets and listen to business podcasts to stay updated on current market trends.
3. Pick a niche
Specializing in a specific industry (e.g. SaaS, finance, healthcare) can help you establish expertise faster. Investigate different industries to identify a niche with a strong demand for writers and an area you are passionate about.
4. Create writing samples
Put together 3-5 strong B2B writing samples that showcase your abilities. Craft writing samples that demonstrate a range of formats such as blog posts, case studies, white papers, and newsletters. Ensure your samples are relevant to your chosen niche, showcasing your understanding of the industry’s language and pain points.
5. Look for opportunities
Search for B2B writing jobs on LinkedIn, freelance marketplaces, or pitch services to B2B writing agencies and companies directly. Create a list of potential B2B companies you admire and reach out to them with a well-crafted pitch offering your writing services.
6. Network and promote yourself
Attend industry events, connect with other writers/marketers, and actively promote your B2B content writing services. Also, keep your LinkedIn profile up to date with your writing niche, engage with industry content, and publish articles related to your field.
B2B writing is a lucrative field with growing demand as more companies look to create engaging, high-quality content. By understanding your audience, honing your skills, and specializing in a niche, you can build a successful career as a B2B writer. Look for opportunities with a b2b content writing agency, or in-house team, or branch out on your own.
Be sure to carefully proofread and edit your work or consider using a professional service like PaperTrue’s expert editing and proofreading services to ensure your writing is polished and error-free. PaperTrue’s experienced editors can help take your B2B writing to the next level and make you stand out in the competitive content landscape!
To understand more about writing-related topics, keep reading!
Crafting a college essay can be a pivotal moment in your academic journey. It’s an opportunity to showcase your voice, share your experiences, and stand out from the crowd.
Picking from a vast array of college essay topics can be overwhelming. That’s why we’ve compiled an exhaustive list of 100 college essay topics. These topics are categorized to boost your creativity and help you find the perfect theme that resonates with your story.
Get an A+ with our expert essay editing services!
We’ve also given helpful tips on how to choose and write the perfect essay for college. So let’s start by understanding how to pick the perfect college essay topic:
How to pick the perfect college essay topic
Selecting good college essay topics is more than just finding a subject that sounds impressive. It’s about finding a genuine fit for your personality and experiences. Here’s how to identify the best college essay topics for your unique narrative:
Reflect on your passions: What excites you? What are you eager to explore further?
Consider your experiences: Which life events have shaped who you are?
Identify your growth: How have challenges and obstacles contributed to your personal development?
Think about relevance: Will this topic be engaging for the admissions committee?
Be authentic: Choose a topic that allows your genuine self to shine through.
With these considerations in mind, let’s dive into a curated list of essay topics for college students, designed to spark inspiration and provoke thought.
2. An encounter that changed your perspective on life.
3. The experience of losing something or someone important.
4. A moment of failure that turned into a lesson of success.
5. Your first day at college and how it met your expectations.
6. A journey that was more than just travel.
7. A significant memory that defines your childhood.
8. The challenge of adapting to a new culture.
9. An act of kindness that left a lasting impact on you.
10. A situation where you had to stand up for what you believed in.
Personal essay topics for college students
Here is a list of top personal essay topics for college:
1. How has a book or movie influenced your understanding of the world?
2. The role of a particular extracurricular activity in shaping who you are.
3. A personal philosophy or mantra that guides your life.
4. The journey of self-discovery during your teenage years.
5. Overcoming a personal struggle to achieve a goal.
6. A cultural tradition that holds significant meaning for you.
7. The impact of a mentor or teacher on your life.
8. A pivotal moment of realization about your identity.
9. How do you cope with stress and maintain mental well-being?
10. The importance of a work-life balance in your personal vision.
Now that we have a list of 100 college essay topics that cover many types of essays and writing styles, let’s delve into how to write an essay, perfect for college!
Writing an essay for college admission is not just about showcasing your knowledge; it’s about telling a story that reflects your identity, aspirations, and the value you can bring to a college community. Whether you’re starting an essay or aiming to conclude an essay, here are steps to ensure your essay stands out:
Understanding the prompt
Before you begin writing, understand the academic writing prompt thoroughly. Make sure you know what the question is asking and how you can address it in a unique way that showcases your strengths and experiences.
Choosing your topic wisely
Select a topic that resonates with you and allows you to share something personal and significant. Know which common college essay topics to avoid, and instead, choose unique college essay topics that allow your personality and voice to shine through.
Crafting a compelling introduction
Your introduction should hook the reader and set the tone for the rest of the essay. Start with an anecdote, a surprising fact, or a thought-provoking question to draw the reader in.
Your essay should sound like you. Use your own voice and avoid overly formal language. The goal is to make the reader feel as though they are getting to know the real you.
Being honest and reflective
Be honest in your writing and reflect on your experiences. Admissions officers can tell when a student is being genuine versus when they’re saying what they think the college wants to hear.
Proofreading and revising
After you’ve written your essay, take the time to do essay proofreading and edit your essay if necessary. Look for grammatical errors, check for flow, and make sure your essay is clear and concise. It can be helpful to have someone else read your essay to provide feedback. You can also use tools like essay checkers to make your work easier.
Avoiding taboo topics
There are certain college essay topics to avoid, such as those that are overly controversial, inappropriate, or cliché. Choose a topic that is meaningful but also appropriate for a diverse audience.
Some examples of essay topics to avoid include:
1. Grandiose tales of heroism that seem exaggerated or implausible.
2. The story of your achievements without reflection on the journey or challenges.
3. Controversial topics that do not contribute to a positive discourse or understanding.
4. Overly polarizing political or religious topics that may not resonate with the reader.
5. Cliched volunteer experiences that don’t reveal anything unique about you.
Ending with impact
Your conclusion should wrap up your essay without simply summarizing what you’ve already said. End with a reflection on how the topic has shaped you or how you’ve grown from the experience.
Your college essay is more than an assignment; it’s a canvas for your experiences and dreams. Choose a topic that resonates with you, and let your passion shine through your words. And while AI essay writers can provide assistance with the initial stages of drafting, the real magic comes from your personal touch and insights.
To ensure your essay truly stands out, consider the expert editing and proofreading services offered by PaperTrue. Our team can sharpen your narrative, correct any linguistic errors, and enhance your essay’s clarity, allowing your unique voice to captivate the admissions committee. Happy writing!
Not all books are created equal: Your book, for instance, is meant to be beautifully printed in the hardcover format. But of the many hardcover book printing services out there, which one’s the best for you? Which one has the largest range of trim sizes and which one allows you to have a gilded edge for your book?
The questions are endless, but our list of the best hardcover book printing companies has all the answers. While ranking the companies on this list, we’ve considered cover formats, type of paper, quality of service, and printing cost. So let’s find out who offers the best custom hardcover book printing services!
Get high-quality book printing services today!
Here are the ten best hardcover book printing services of 2024:
A trusted self-publishing company, PaperTrue offers hardcover bound book printing with no minimum orders. You can print 1 copy or 100, and they’ll be ready to be shipped worldwide in 2–3 days. That’s even faster than BookBaby! Since they offer end-to-end self-publishing services, you’ll probably get a discount if you have their expert edit and design your book as well.
PaperTrue offers two hardcover options: case-bound and jacketed case laminate. The case-bound option is great if you’re publishing children’s books or self-help books, but novels are probably better off with the jacketed case laminate. PaperTrue’s online hardcover book printing costs about $25 for a 200-page book with a black-and-white interior and jacketed case lamination. If you order more than ten copies, they waive the shipping cost!
Amazon has recently started offering hardcover book printing services to their authors. They currently print only case laminate hardcover books, though, so your book won’t have a dust jacket. They offer five trim sizes and require your page count to be at least 75 and under 550.
As with most other publishing-related steps, Amazon has specialized tools that help you resize your book cover. Using these, you can reshape an existing book cover design, create a cover template to guide your designer or create your own cover. KDP has a formula for calculating your hardcover book printing cost:
Fixed cost + (page count x per page cost) = printing cost
You can find a detailed chart of various printing rates here, using which you can calculate the exact printing cost for your book. On average, printing a regular trim size hardcover of 200 pages, in black and white, will cost you about $8.
Barnes & Noble Press is well-known for creating high-quality books through their custom hardcover book printing services. They use premium paper and offer a great print quality in both, color and black-and-white. You can print hardcover copies with dust jackets and printed cases.
Placing an order with B&N is fairly simple, and you can figure out your estimated printing cost by using their handy tool. Once you finalize and place your order, it’ll be delivered in ten days. However, a drawback of working with Barnes & Noble Press is that any changes to your print specifications take a long time. It costs about $11 to print a 200-page black-and-white hardcover book with a full dust jacket.
Cost per copy: $11
Royalty rate: 55%
#4IngramSpark
One of the leading self-publishing companies out there, IngramSpark offers four hardcover options: case laminate, blue cloth cover, gray cloth cover, and jacketed case laminate. Blue and gray cloth cover options can be chosen with or without dust jackets. However, the last three options are available for a limited number of trim sizes. If you’re publishing an 8×10 cookbook, for instance, you’ll have to stick with the case laminate option.
It costs about $10 to print a 200-page black-and-white hardcover book with a case laminate jacket, but this is just the base price. You’ll have to pay the tax and shipping costs as well, making the actual printing cost around $14. This may get even more expensive for international authors.
If you’re looking for hardcover photo book printing services, IngramSpark is a solid option. Combined with its superior color quality and wide reach, it more than makes up for the printing cost. However, their shipping tends to be a bit slow, so make sure you’re accounting for some delays!
Cost per copy: $14
Royalty rate: 70%
#5Lulu
Lulu has an intuitive interface that makes printing hardcover books fairly simple and easy. They offer two hardcover options: case wrap and linen wrap with a dust jacket. The second option is available for selective trim sizes. The platform is quite adaptive, supporting everything from hardcover children’s book printing to textbook printing.
The pricing for printing a black-and-white hardcover book with Lulu is $14, which is similar to IngramSpark. The platform offers various book design templates and is well-integrated with CreateSpace and KDP. However, interior color print with Lulu can be more expensive than other options.
Like most other print-on-demand companies on this list, Lulu doesn’t have any minimum order value. So if you’re looking for single hardcover book printing, they’re a great option!
Cost per copy: $14
Royalty rate: 80% of gross profit (gross profit = total revenue – print cost & distribution fees)
#6BookBaby
BookBaby offers stellar quality print with premium color and three paper options. Plus, their hardcover book printing service is super fast and can get you your copies within five days! They offer two hardcover options: adhesive case wrap and adhesive case wrap with a dust jacket. With eight book sizes available, they cover the needs of a wide variety of writers.
The cost of printing a hardcover book with BookBaby is around $19, but they don’t offer flexibility with the number of copies. You can either opt for single hardcover book printing or get 25 copies, which brings down the individual cost to $17. Slightly on the pricier end of things, this hardcover book printing company is for those with big orders and tight deadlines!
PrintNinja excels at printing a large number of copies. In fact, they don’t offer single hardcover book printing and take only bulk orders with a minimum of 250 copies. They’ve partnered with several companies in China to accomplish this task. They offer four hardcover options: coated paper, uncoated textured paper, cloth cover, and faux leather cover. There are 12 color options for a cloth cover and 6 for a faux leather cover.
Additionally, you can also get effects like embossing, debossing, and metallic foil stamping on your cover to add some pizzaz. You can even customize the edge of your book and get a gilded or print finish on it. We haven’t seen this option on any other hardcover book printing service on this list!
PrintNinja charges $3,900.76 for 250 copies of a 200-page standard hardcover book with a black-and-white interior. This means you get one copy at $15.6, which is fairly standard.
Cost per copy: $15
Royalty rate: None (they’re not a retailer)
#8Blurb
A renowned hardcover photo book printing service, Blurb can help you publish an art book, cookbook, or any other nonfiction book. It’s also a good option for hardcover children’s book printing. However, be careful while using Lightroom with Blurb, since the color profile doesn’t render as well.
Blurb offers two major options for its hardcover photo books: hardcover image wrap and hardcover dust jacket. Their hardcover book printing price for a 200-page black-and-white book with a dust jacket is about $19. This is more expensive than other services on this list, and Blurb’s text print isn’t worth the cost.
Their cost for publishing a 100-page hardcover photo book with premium luster paper is around $82.
Cost per copy: $19
Royalty rate: 100% through Blurb Store
#9Mixam
Mixam specializes in hardcover children’s book printing services and also prints other graphic-heavy books. They offer 17 trim sizes and 5 types of paper along with two binding options: adhesive casebound and Smyth sewn. You can get the cover with a matte or gloss lamination, and the same options are available for the dust jacket as well.
Mixam’s cost of printing a hardcover book is $51, for a 200-page without a dust jacket. With a dust jacket, the price goes up to $142! This is quite expensive, so the platform is best suited for shorter photo books. One downside of working with Mixam is that their printing process tends to be slower. Make sure to go through their policies carefully before you place an order!
Cost per copy: $51
Royalty rate: None (they’re not a retailer)
#10Pixartprinting
A European printing company, Pixartprinting offers five trim sizes and three types of paper to choose from. There are no cover options other than basic case laminate and you don’t get a dust jacket. This makes it a good option for hardcover children’s book printing, but not the best for fiction. You can add a special finish to your cover with a 3D varnish, gold foil, or silver foil.
If you print a single hardcover book with Pixartprinting, it’ll cost you €68.78, which is roughly $74.65. However, the per-copy cost goes down dramatically if you order in bulk. If you order 25 copies, each copy will cost you €10.01, which is about $11. So while this company order doesn’t strictly have a minimum order policy, they’re perhaps best suited for bulk orders!
Cost per copy: $11 (€10.01 when ordering 25 copies)
Royalty rate: None (they’re not a retailer)
So those are the best hardcover book printing services of this year. We hope this list helps you find the perfect book printing partner. You can compare the pros, cons, and hardcover book printing prices for all these services. But if you’re just starting out, our self-publishing services might just put you on the path to success!
If you’d like to keep reading about self-publishing a book, here are some resources that could help:
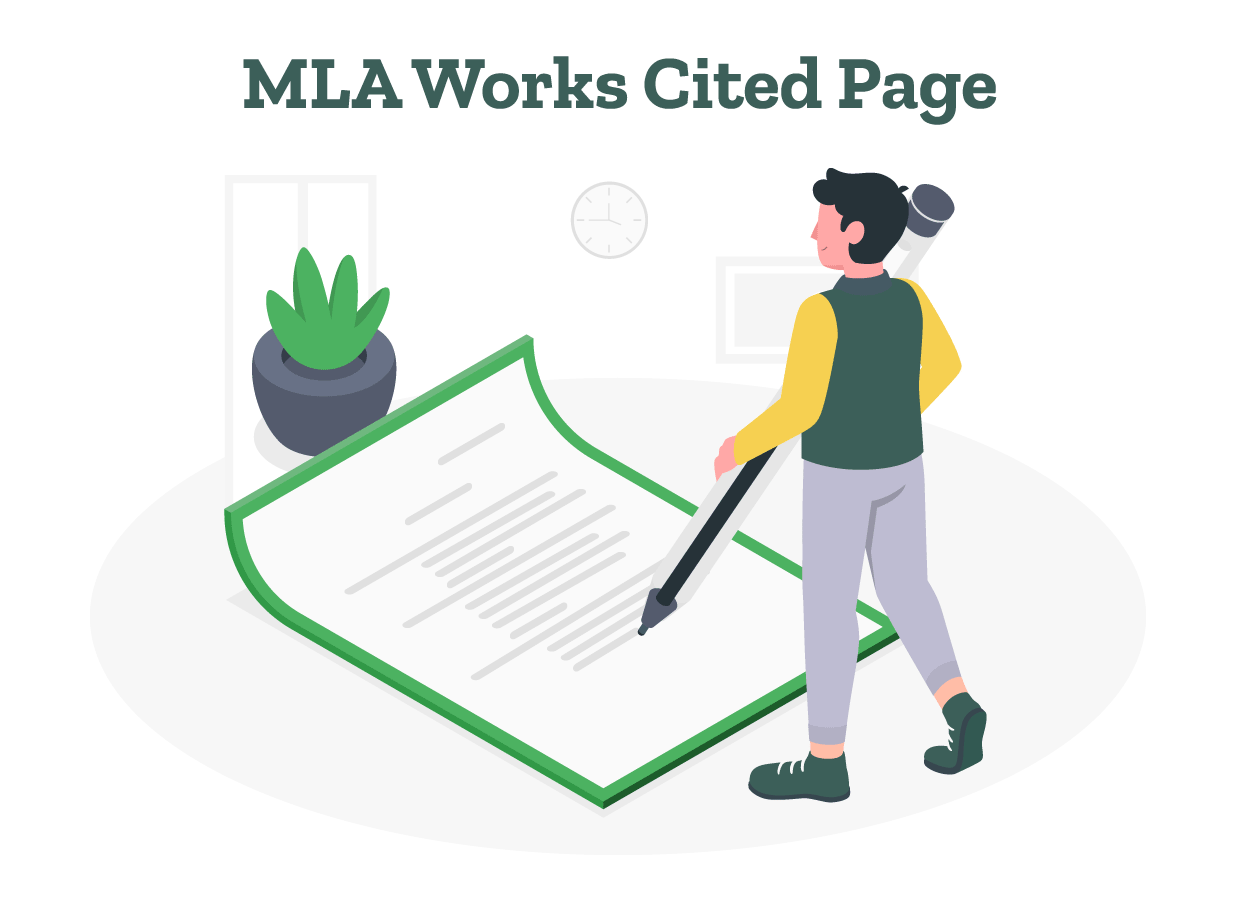
An MLA reference page, which you may know as the MLA works cited page, can be confusing for many students. For starters, the ninth edition of the MLA Handbook also allows a bibliography, which is quite similar to a list of works cited. So do you need an MLA format works cited page or a bibliography?
What are the rules for listing works cited in MLA format? How should you format individual entries? What should you include in them? We’ve answered all the questions you could have about the MLA works cited page format.
Get your MLA citations cross-checked by skilled editors!
If you’re a visual learner, we’ve created an MLA works cited example, complete with labels. If you’d like a template, let us know in the comments and we’ll add one!
Bibliography vs. works cited: What is the difference?
Although they’re sometimes used interchangeably, bibliography and list of works cited are different from each other.
Bibliography: A list of all the works consulted by the author during their research.
Works cited: A list of all the works directly referred to (cited) in the document.
You may use a bibliography to list all the works related to your work so readers can use them for further research. A list of works cited, however, merely holds complete entries for all in-text citations in your document.
An MLA annotated bibliography contains a note corresponding to each entry, explaining its relevance to your research.
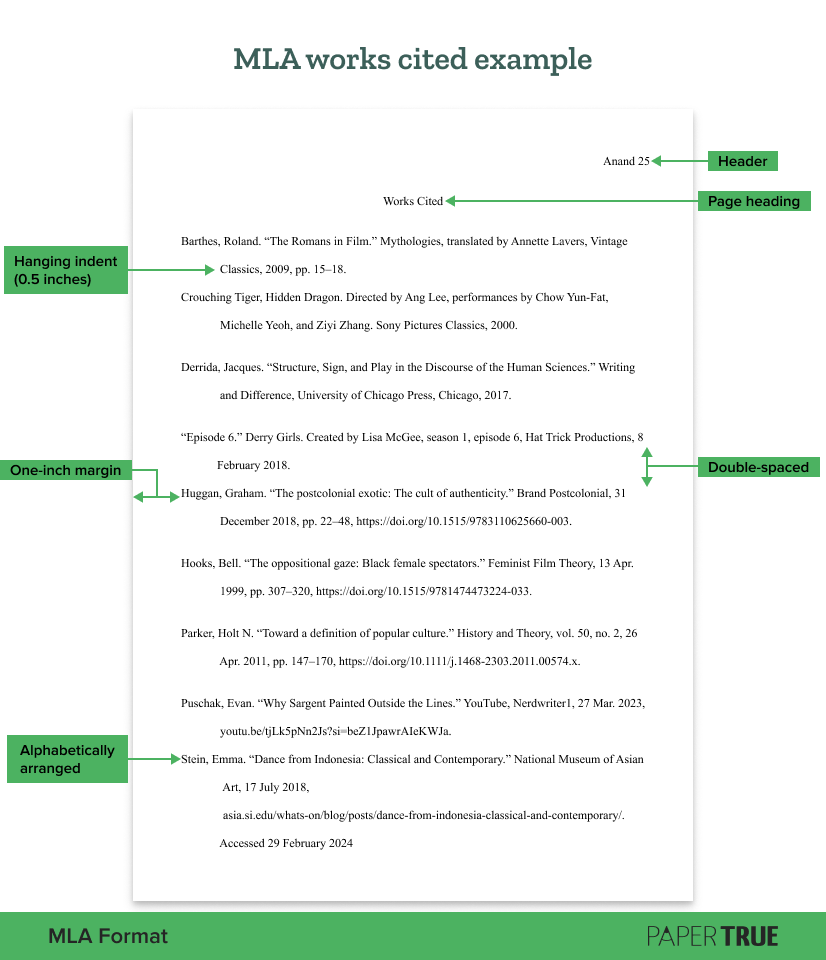
Place the works cited page after the body of your paper or thesis.
Maintain a one-inch margin on all sides.
Add an MLA header (last name and page number) in the upper right corner.
Double-space the entire page.
Use an 11- to 13-point standard font (Times New Roman, Arial, Georgia, or Calibri).
At the top of the page, add the heading “Works Cited” and center it.
Keep the heading consistent with others in the document.
Left-align the citations.
Add citations in alphabetical order by the first letter of your MLA format citation. (This is usually the author’s last name, but may be other entities as well.)
Add a hanging indent (0.5 inches for the second and subsequent lines of the citation) through the indentation options in Word or Docs.
In case you’re confused, scroll down and check out the MLA works cited page example. That should clarify things!
A list of works cited in MLA style should have an entry corresponding to every in-text citation in the document. If you use a source without crediting the author, you’re effectively plagiarizing their work. Needless to say, this is very bad for your paper, dissertation, or research article! Not to mention, it undermines your academic integrity.
Note: If you’re citing only one source, the page heading will be “Work Cited”.
How to format entries in an MLA format reference page
This is the general format for entries on an MLA reference page:
Author’s Last Name, First Name. “Title of the source.” Title of the container, Other Contributor’s First Name, Last Name, version, number, Publisher, publication date, location.
Here’s a corresponding example:
Barthes, Roland. “The Romans in Film.” Mythologies, translated by Annette Lavers, Vintage Classics, 2009, pp. 15–18.
An author’s name in the MLA works cited format is always inverted. But this changes if a work has more than one author. These are the three variations you can use while writing the author’s name in the MLA 9 format:
Note: The page range (indicated by p. or pp.), URL, and DOI for a source are its “location” within a container, whether a book or database.
While writing your paper or dissertation, you may come across sources that don’t follow the MLA works cited format mentioned above. So let’s take a look at some popular sources and the most common ways to cite them.
Remember these formatting tips while citing a book:
If a book has only editors and no writers, mention the editors as its “authors”.
While citing a self-published book, no publisher details are required except the year of publication.
2. Book chapter
If there’s no editor for the entire work, you may leave out that detail. Here’s how to include a book chapter to your works cited page in MLA format:
Author(s). “Chapter Title.” Book Title: Subtitle, edited by [Editor(s)], Publisher, year of publication, page range.
Paster, Gail Kern. “The tragic subject and its passions.” The Cambridge Companion to Shakespearean Tragedy, edited by Claire McEachern, Cambridge University Press, Cambridge, United Kingdom, 2013, pp. 142–160.
Observe how in the chapter title above, we’ve preserved the capitalization convention of the original. That’s what you should do!
3. Journal article
A DOI is a simple way for your readers to find an article, so always mention it if one is available. If a DOI or permalink isn’t available, you may mention the URL. Here’s the MLA 9 format for citing a journal article:
Author(s). “Article title.” Journal Name, volume, issue number, year of publication, (pages). DOI or URL. 2nd container name.
Huggan, Graham. “The postcolonial exotic: The cult of authenticity.” Brand Postcolonial, 31 Dec. 2018, pp. 22–48, https://doi.org/10.1515/9783110625660-003.
You’ll usually find these details on the title page of the articles you’ve referred to. If an author isn’t listed, the works cited entry should begin with the article title.
While citing a website, remember to credit the publisher. You can often find this in the copyright details at the bottom of the page. If the publisher/sponsor is the same as the website named, you don’t have to name it a second time. Here’s how to include a website to a works cited page in MLA format:
Author name(s). “Title of the Webpage.” Title of the Website, Publisher, day-month-year of publication, URL. Accessed day-month-year.
Stein, Emma. “Dance from Indonesia: Classical and Contemporary.” National Museum of Asian Art, 17 Jul. 2018, asia.si.edu/whats-on/blog/posts/dance-from-indonesia-classical-and-contemporary/. Accessed 29 Feb. 2024
Here are the formats for citing a streaming video, movie, and TV episode:
Author(s). “Title of Video.” Title of the Hosting Website, day-month-year of publication, URL of video.
Title of Movie. Director, performers. Production Company, year of release.
“Title of Episode.” Title of TV Series. Contributors(s), season, episode, Production Company, day-month-year of release.
These are the corresponding MLA reference page examples:
Puschak, Evan. “Why Sargent Painted Outside the Lines.” YouTube, Nerdwriter1, 27 Mar. 2023, youtu.be/tjLk5pNn2Js?si=beZ1JpawrAIeKWJa.
Crouching Tiger, Hidden Dragon. Directed by Ang Lee, performances by Chow Yun-Fat, Michelle Yeoh, and Ziyi Zhang. Sony Pictures Classics, 2000.
“Episode 6.” Derry Girls. Created by Lisa McGee, season 1, episode 6, Hat Trick Productions, 8 Feb. 2018.
While citing a TV episode, include the contributors most relevant to your research. If you’re exploring Clare’s identity through the episode, you should name the actress Nicola Coughlan. But if you’re simply researching Irish history, mentioning the creator is just fine.
Want to find out how to cite plays, poetry, and the Bible? Maybe our guide on MLA citation examples can help!
MLA works cited example
We know that it’s never enough to merely list the formatting instructions. Visual aids are always necessary! Here’s an MLA works cited page example:
That concludes our guide on how to format an MLA works cited page. We hope the MLA format works cited example helped. If you need a second opinion on your writing, our paper editing services are at your disposal. All the best!
If you’d like to keep reading about academic writing and formatting, here are some more resources:
Get carefully curated resources about writing, editing, and publishing in the comfort of your inbox.
[contact-form-7 id="12723" title="Subscribe Form"]
How to Copyright Your Book?
If you’ve thought about copyrighting your book, you’re on the right path.
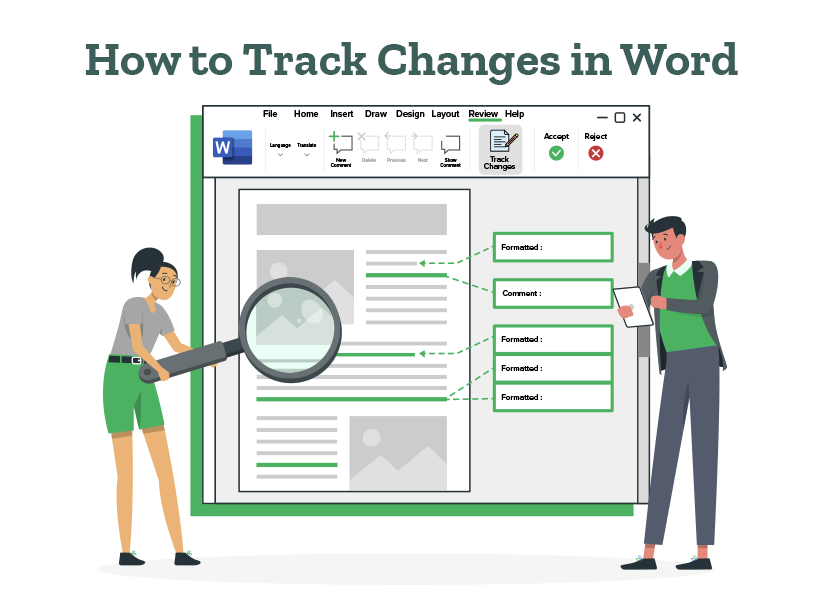


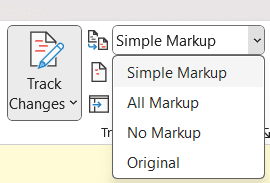


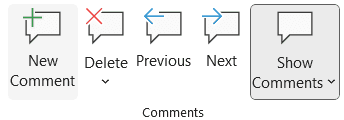
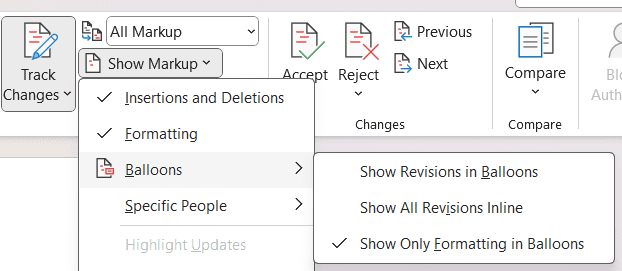
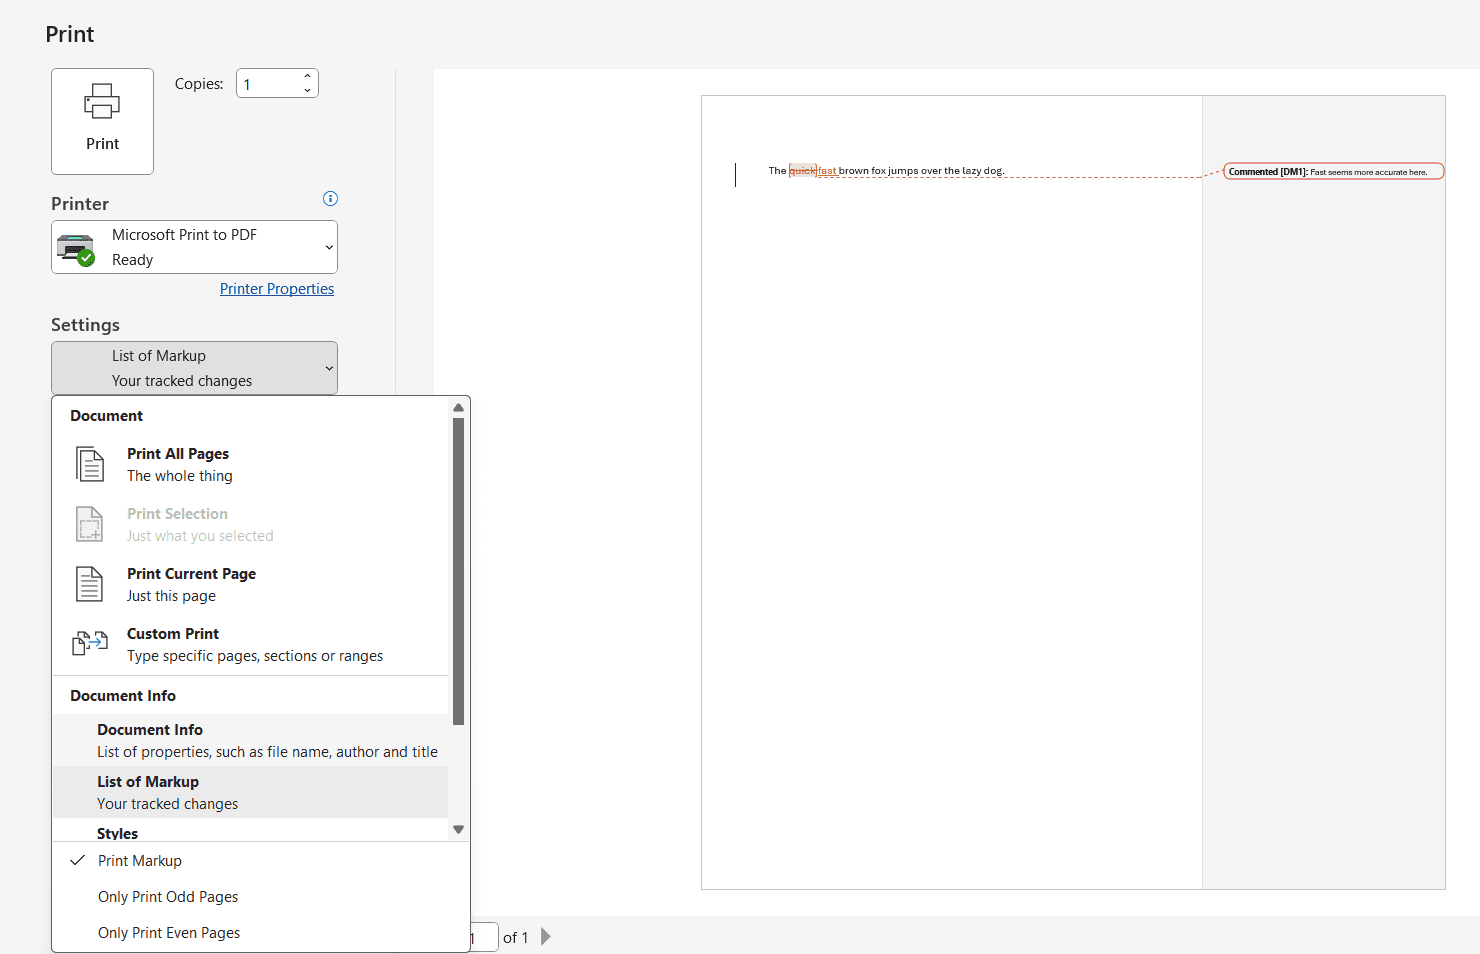
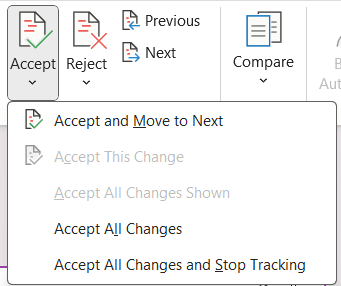
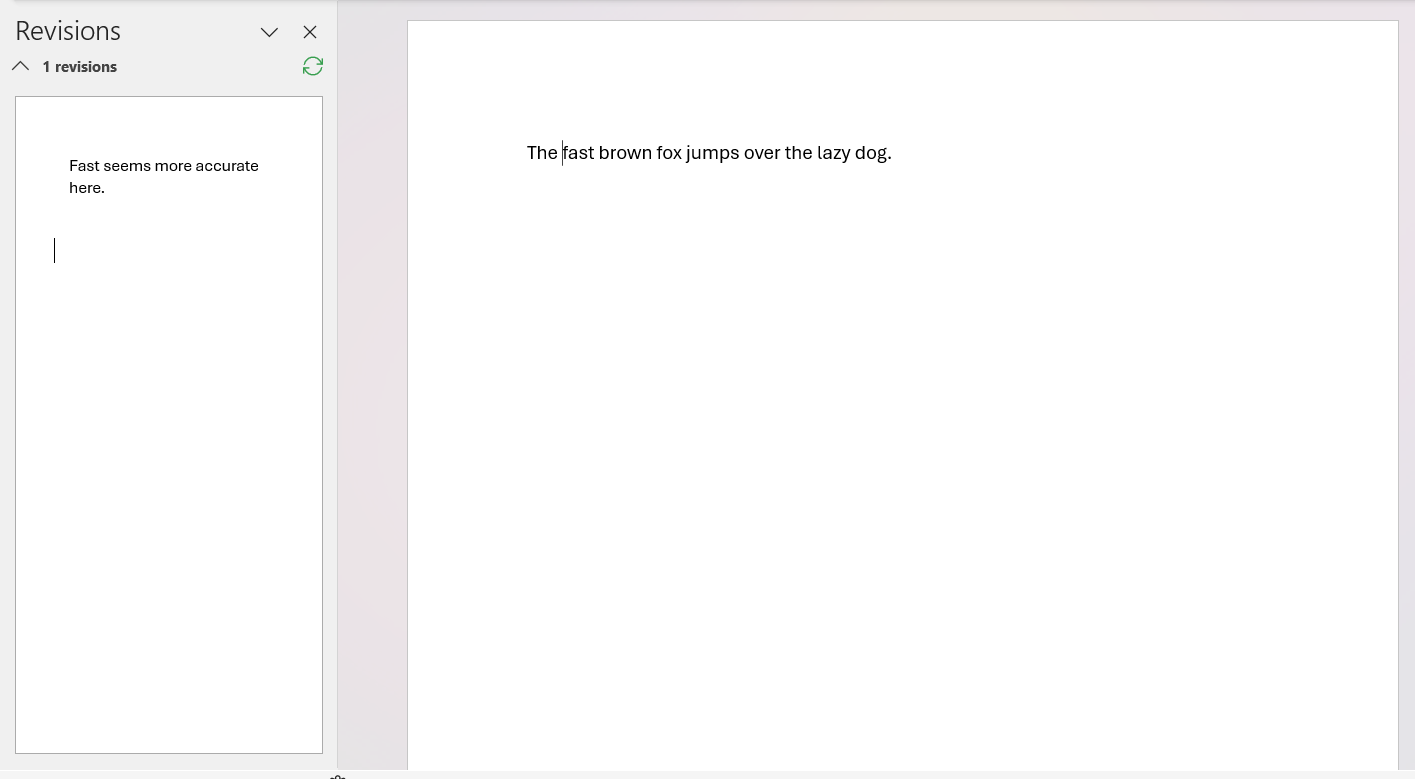
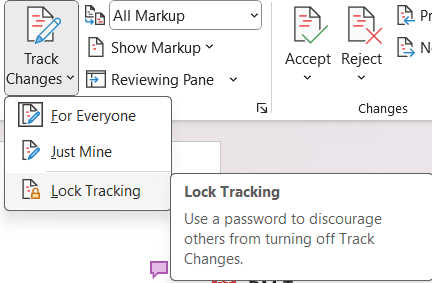 Now that you’ve got the lowdown on enabling, utilizing, and clearing track changes in Word, you’re all set to tackle any document revisions like a pro. So, dive into your next group project with gusto, knowing that Track Changes from Microsoft Word will have your back every step of the way.
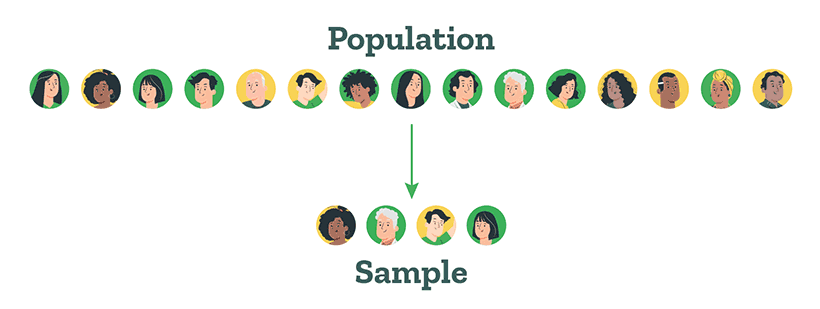
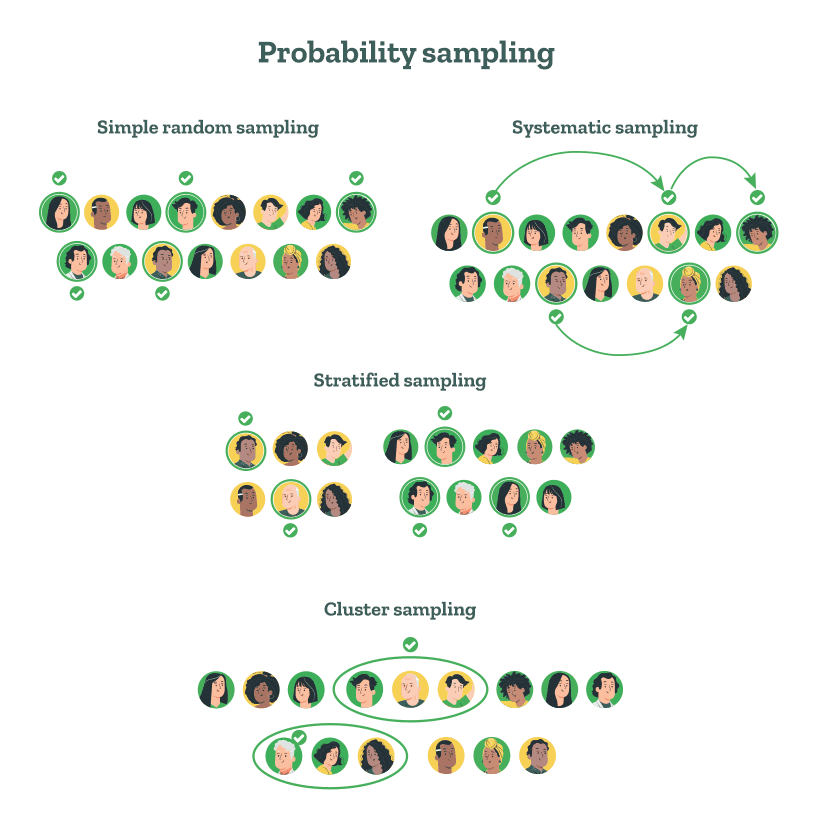
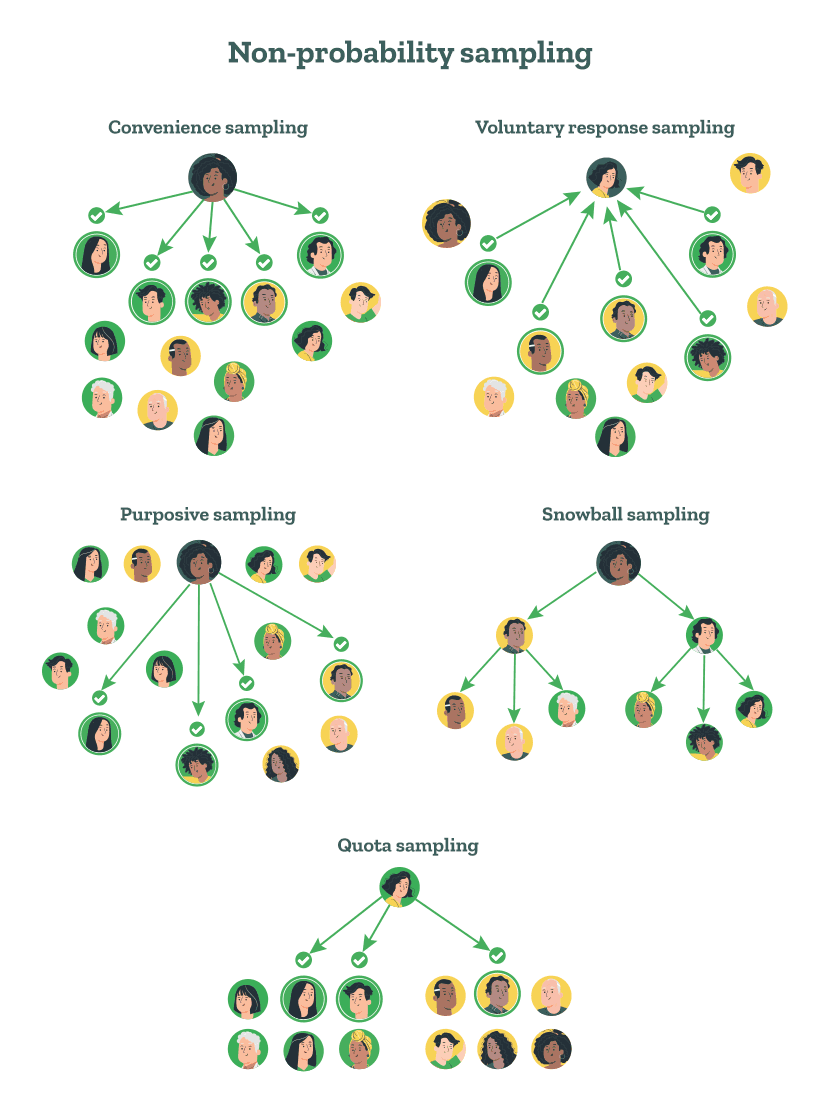
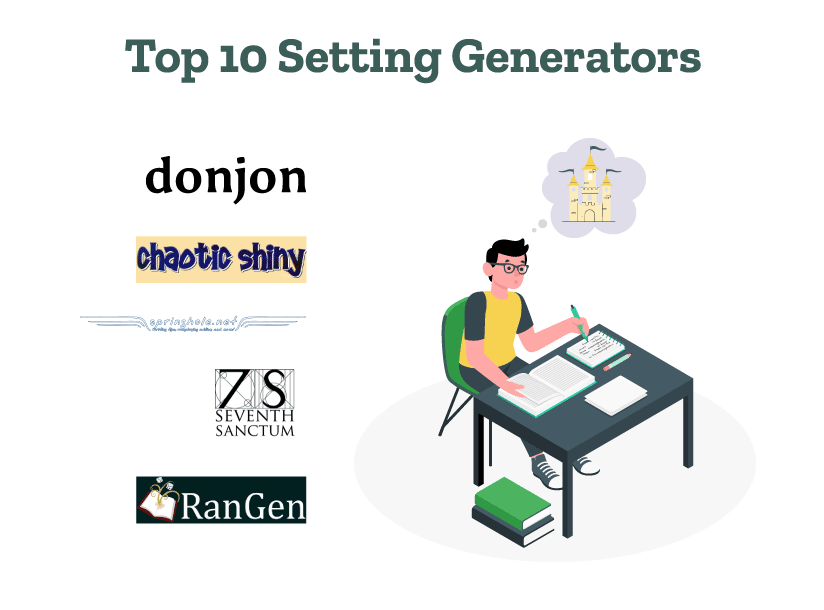
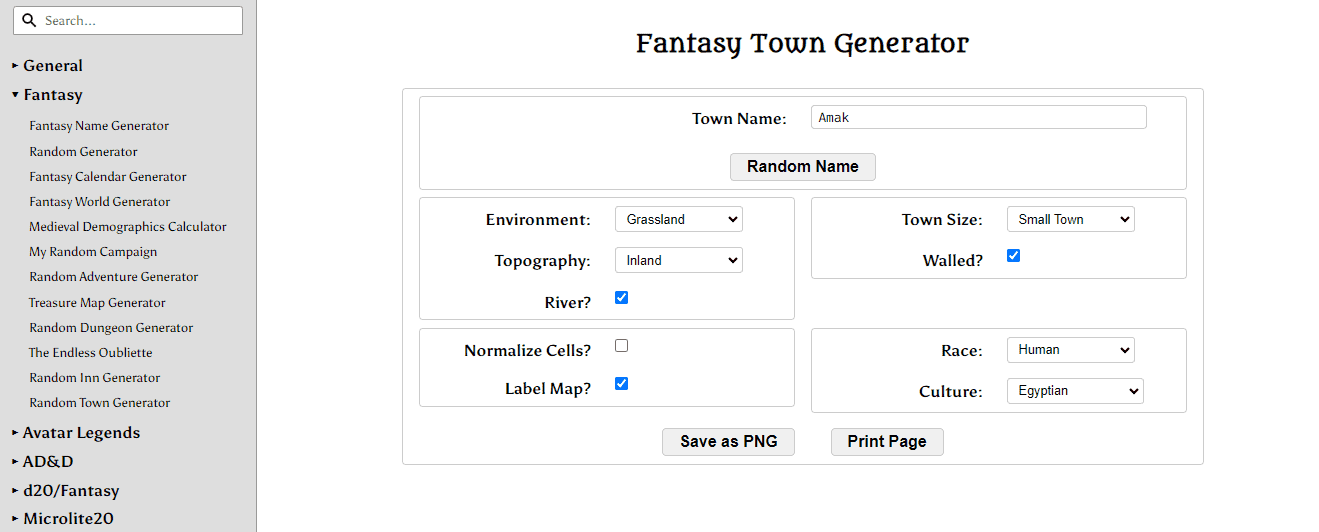
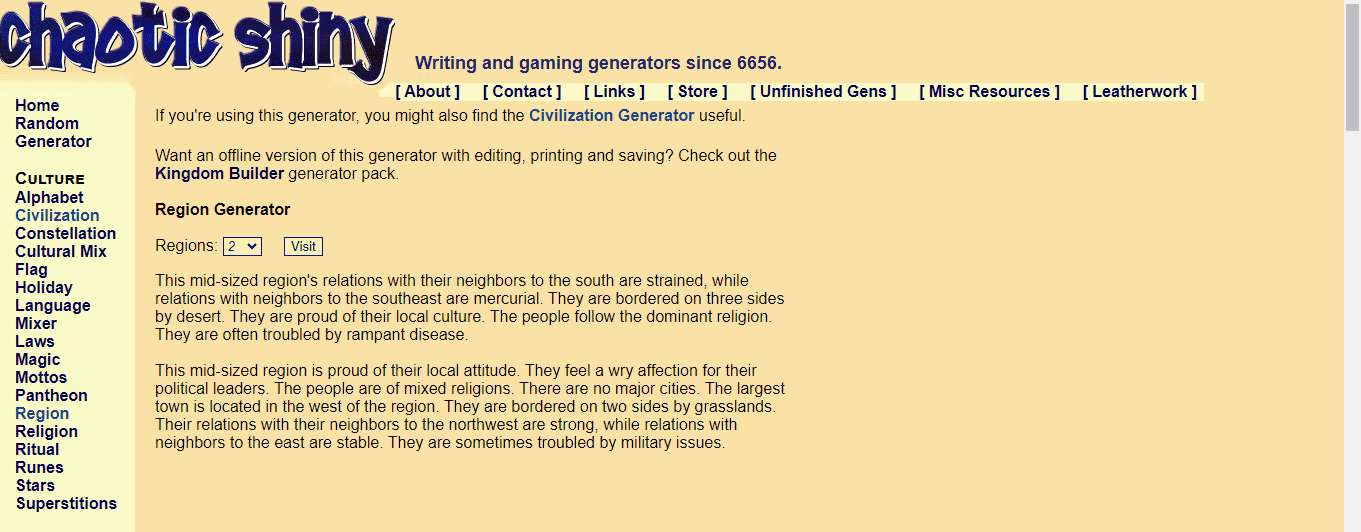
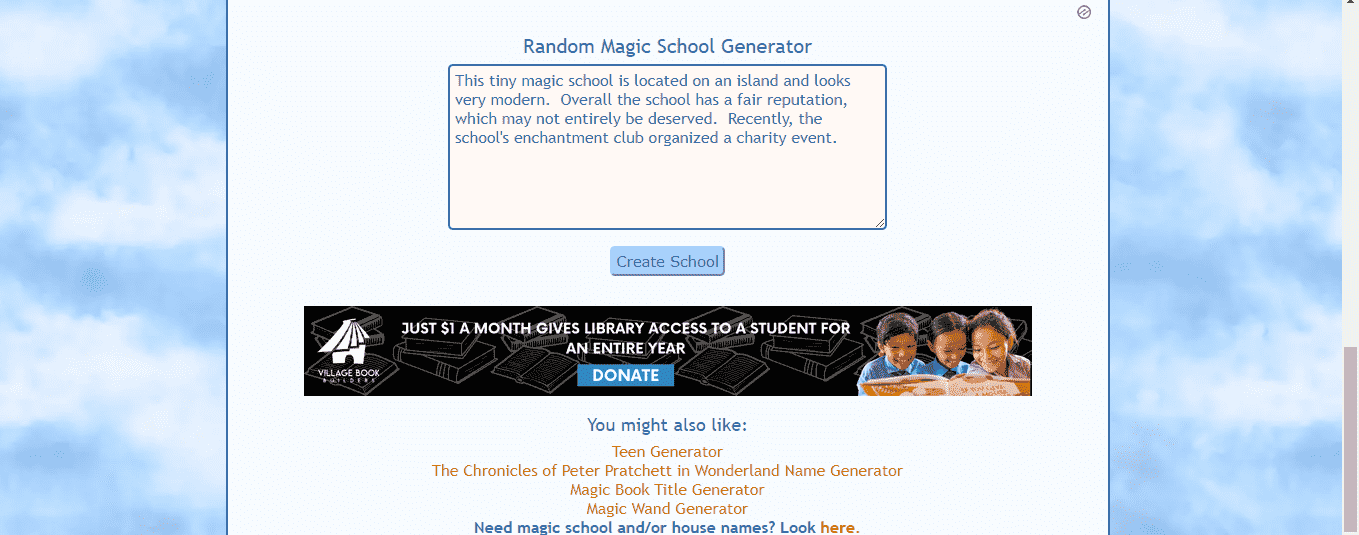
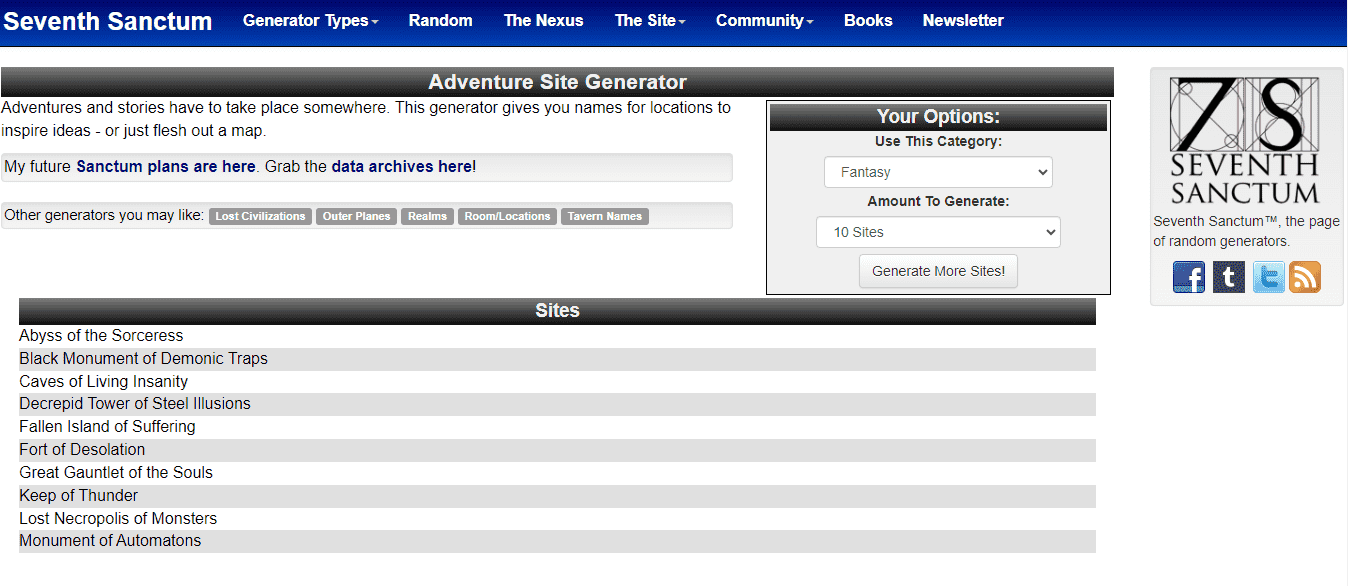
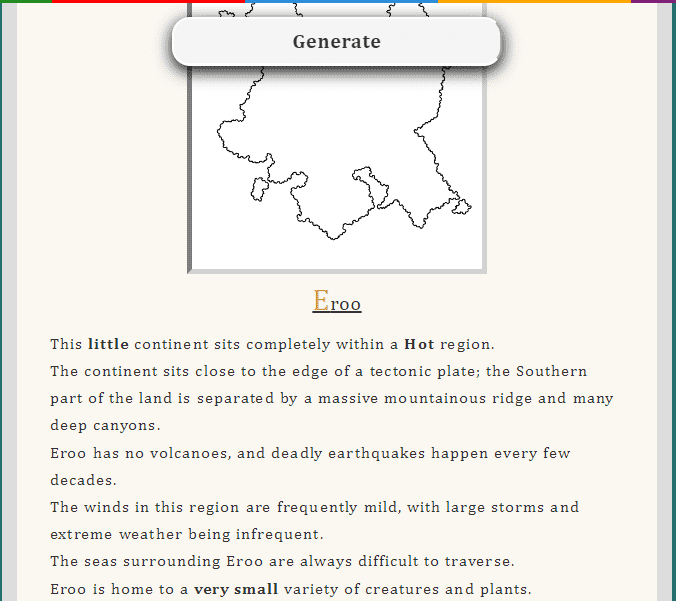
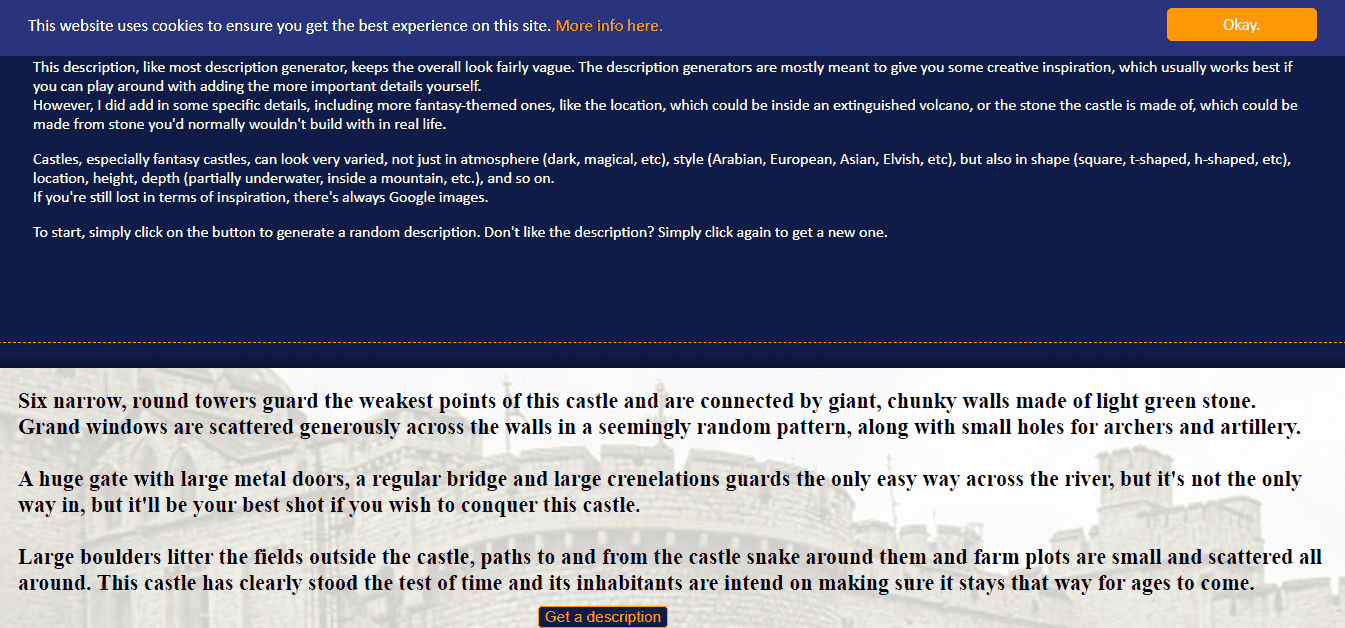
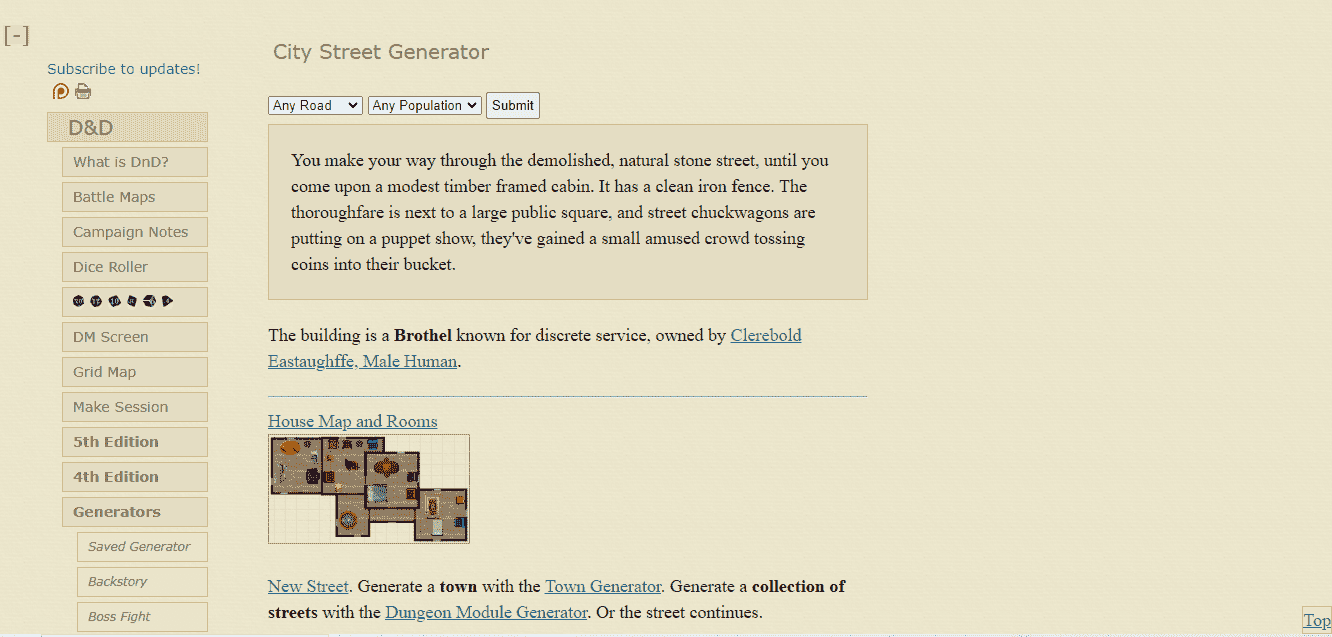
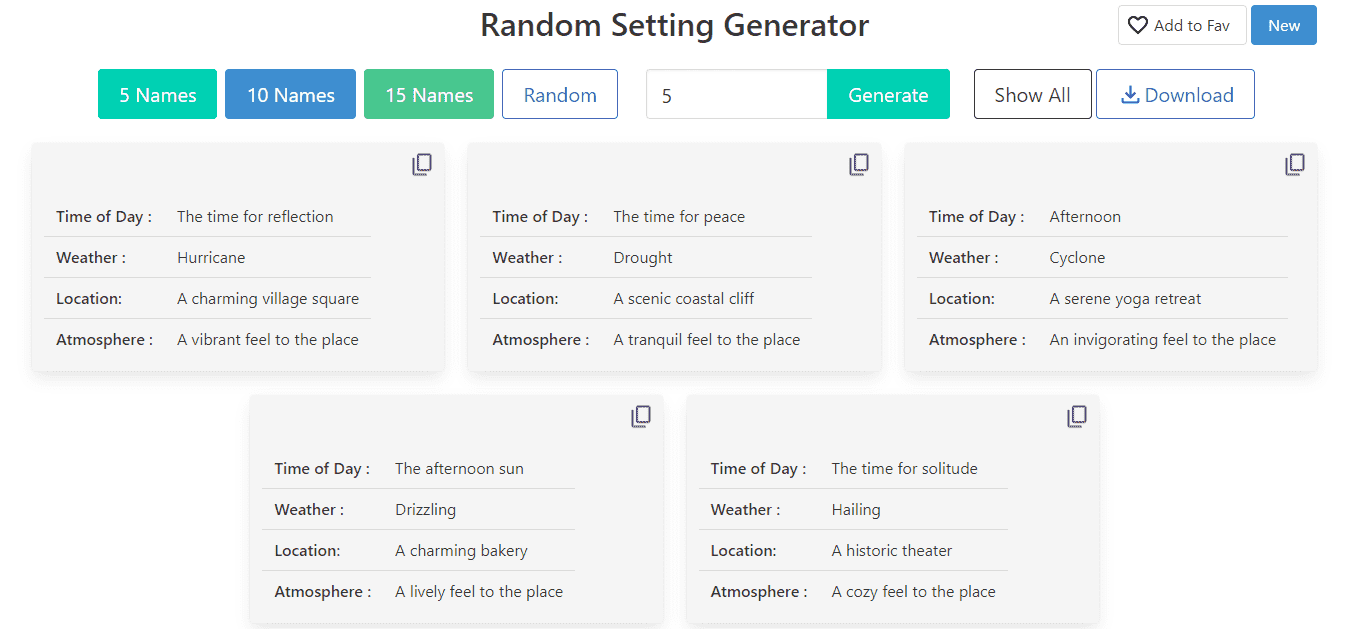
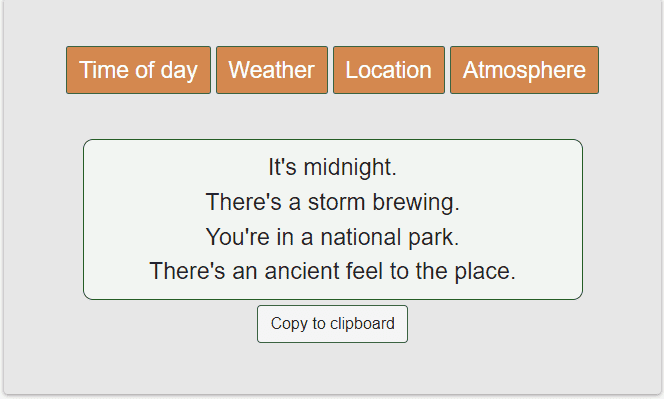
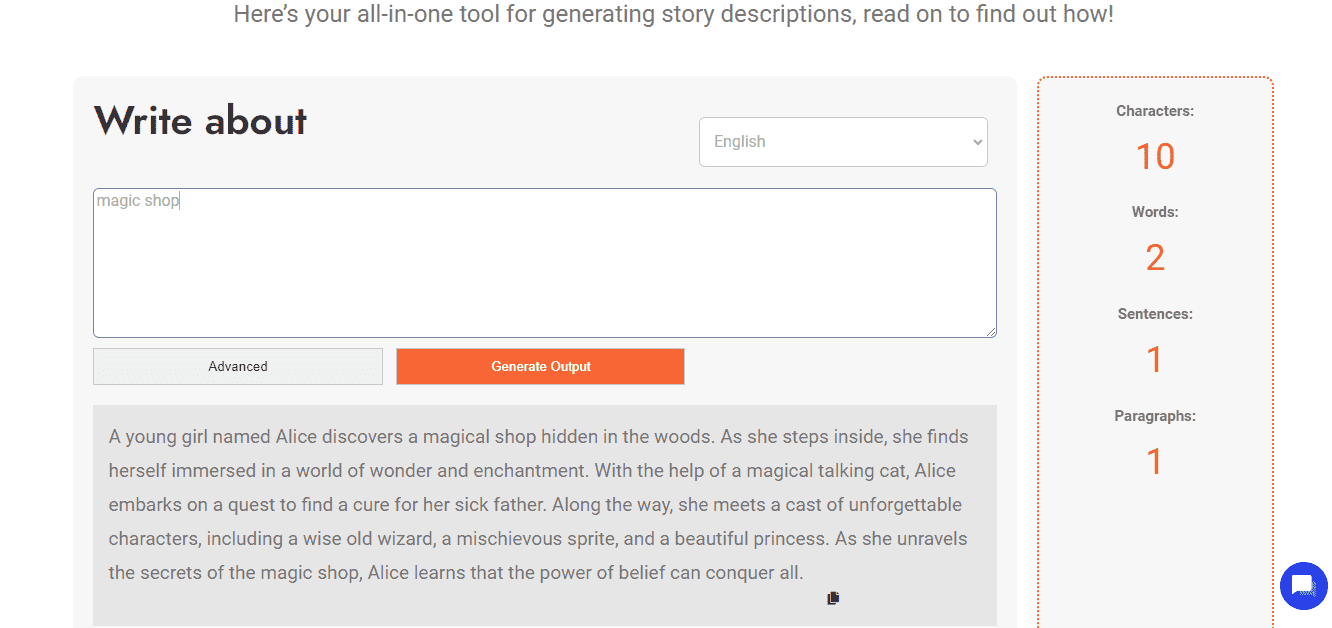

![Top 10 Hardcover Book Printing Services [Best of 2024]](https://www.papertrue.com/blog/wp-content/uploads/2024/03/Top-10-Hardcover-Book-Printing-Services.png)